| |
|
"Tuning" your Printer and Scanner
|
 |
|
Alignment is critical for all printing solutions. For
B&W printing, you must add two elements being the darkness of
the printed responses and the scan darkness of the OMR scanner.
|
| Alignment |
Alignment is measured using the file Ltr-BW.frm (alternate A4-BW.frm)
which you should copy and name with this physical laser printer name,
then print from FoD-OMR. The middle section of this sheet
should read perfectly from Channel 23 and less well the further from
Channel 23 that you go.
Please make up a sheet read definition for this sheet so you can see
channels 16 through 30.
The best definition is to show co-ordinates so you get back this as the
result:
| Channel 16-22: |
YYYYYYY |
left of the central channel |
| Channel 23: |
Y |
channel 23 is the mid channel |
| Channel 24-30: |
YYYYYYY |
right of the central channel |
If you have more left-hand "hits" than right-hand "hits" you will need
to move responses to the left, and move right for the converse. Each
pre-slugged response moves 2/300 inches from the center (23rd)
channel. The difference between Left and Right hits divided by two is
the amount to move, negative for left movement, positive for right
movement, in 1/300ths.
- Click Page
Setup in the File
menu.
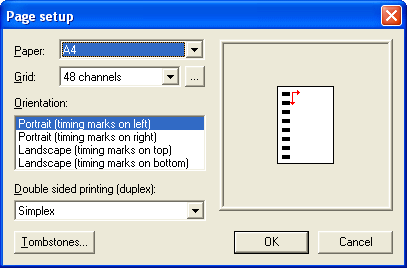
- Click the Finder
 button next to the Grid list to create
a custom grid definition. button next to the Grid list to create
a custom grid definition.
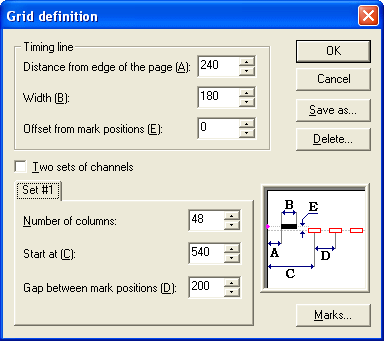
- Adjust the distance from the paper edge
to the middle of the first column (value C) in the dialog box
diagram). Reduce to move left, increase to move
right. Remember the adjustment calculated was in 1/300ths
where this value is 1/1200ths, so multiply by
four for your adjustment.
Remember to print and try again please.
|
|
| Top
|
| Darkness |
Print darkness is in two parts, the darkness of the response shape and
the darkness of the response
text when placed inside the response. If you have the
response text outside the response shape (between timing marks or in an
unread area) please ignore the instructions for response text.
Response
shape
Use the above form and check the darkness of the response shape (from
the second channel) against the response shape you intend to
use. If the result is too light for your human audience,
please use the Printer Control Panel to darken the image until it is
“acceptable”, then check it through the scanner and make sure the
scanner will not read the darker response mark.
Response
text
Use the above form and read the text-only blocks in these locations:
Channel
2, Rows 19-30
Channel 42, Rows 16-27
Select the value below the first value read and now attempt to read
that response from the blocks of 5 responses above and below the
center, for the value and response shape you have chosen thus far. All
should not read, the next block
should have one or two reads only. Adjust until you get no reads - this
is your levels for all B&W OMR forms ON THIS PRINTER.
|
|
| Top
|
|
|
|
