Tools & Options


Design Options
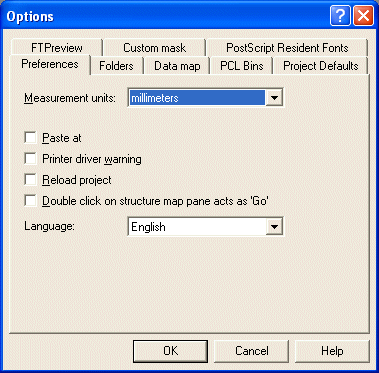
Before you start designing forms you can customize your design environment to suit your own preferences. To view the current design environment settings, select Options from the Tools menu.
Preferences
On the Preference tab, you can set the following options:
- Measurement units - allows you to select the unit of measurement used for all design functions. Options include millimetres, centimetres, inches, points, picas and 300dpi.
- Paste at - allows you to select where an object pasted from the clipboard will be inserted.
- Printer driver warning - a warning is given when an incompatible printer is selected.
- Reload project - FTDesign automatically reloads the last project on start up.
- Double click on structure map pane acts as 'Go' - when selected, double-clicking on a page element in the structure map pane will place that page element in focus in the design window.
- Language - Changes the language used in FTDesign, FTSplitDef and the Repaginator. These applications must be restarted in order for this change to take effect. FTDesign, FTSplitDef and the Repaginator will now be displayed in the selected language, including menus, dialog boxes, field names and page element names.
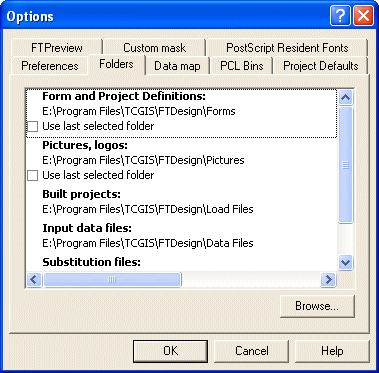
Folders
On the Folders tab, you can set the following options.
- Forms and Project definitions directory - default directory when opening and saving a new form. Select Use last selected folder to set the default form and project directory to the last folder selected when opening or saving a form or project.
- Pictures, logos directory - default directory when inserting a picture or a logo on the form. Select Use last selected folder to set the default picture directory to the last folder selected when inserting a picture.
- Built projects directory - default directory for output built project (.asc) files.
- Substitution files directory - default directory for test substitutions files.
Data Map
On the Data map tab, you can set the following options
- Revert to 'Select' mode after mapping - after a data field is mapped, the cursor will return to select mode.
- Apply underlying text after move/resize - when a test field is moved to another data field, the rule will change so it reflects the new data.
- Colors - select your own colors for print mapping in Print Line mode.

PCL/PCLXL Bins
FTDesign establishes the "normal" bins for your printers via a routine you may see occasionally and at the first execution. Download this for a PDF that describes what the program does and how you might adjust the information.
Available custom PCL/PCLXL bins store the required attributes to force the printer to select other than the normal bin for input and output. Input is for paper selection, output for is destination. This section assumes you will give preference to one of PCL (PCL5e or PCL5c) or PCLXL (PCL6) for your bin selections for custom bins as they are different. PostScript bins cannot be permanently labeled in this fashion as they are provided by the printer driver.
On the PCL Bins tab, you can set the following options:
- Name - the name of the custom printer bin to be displayed in FTDesign. Custom PCL Bins are used to define extra printer input and output bins when the printer driver does not make them visible. Make this different - e.g. Custom Bin 2.
- Bin type - set whether the custom bin is an input tray or output bin.
- PCL Escape - set the numeric part of the PCL escape code for selecting the custom bin. This value can be found in your printer manual. You MUST consult your printer manual as different manufacturers may use different values for the same logical bin.
You can edit the preferences of any custom PCL bin at any time by simply left-clicking the appropriate bin in the Available custom PCL bins box and changing the settings. PCL bins are only available when a PCL/PCLXL printer driver has been selected.
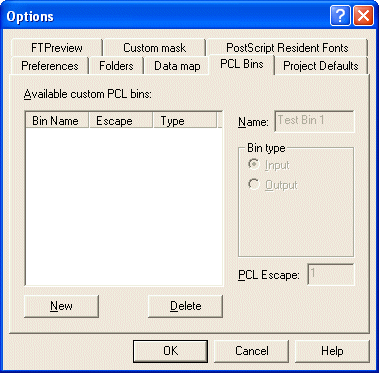
Press here to download sample files for PCLXL bin selection.
This is a list of PCLXL Bins from a recent HP manual, you will need to check the codes and tray descriptions with your manufacturer's PCL/PCLXL manual. A .zip file with example files can be downloaded by pressing here.
| Input Tray | Value |
|
Default Source Auto Select Manual Feed Multi Purpose Tray Upper Cassette Lower Cassette Envelope Tray Third Cassette External Tray 1 .... External Tray 248 |
0 1 2 3 4 5 6 7 8 ... 255 |
External input trays 1 through 248 are selected by substituting the values 8 through 255 for the enumerated values. Examples above, 8 = External tray 1, 255 = External tray 248.
| Output Bin | Value |
|
Default Destination Face Down Bin Face Up Bin Job Offset Bin External Bin 1 .... External Bin 251 |
0 1 2 3 5 ... 255 |
External output bins 1 through 251 are selected by substituting the values 5 through 255 for the enumerated values. Examples above, 5 = External output bin 1, 255 = External output bin 251.
PCLXL Bins Example
This shows how to use of input tray 2 for a Fuji Xerox model DocuPrint C3350 in Japan where the manual
shows the value for Tray 2 to to be "5" - equivalent of Cassette 2 for HP.
Make sure the printer driver is PCLXL (PCL6) for this model.
Go to Tools, Options, PCL Bins tab, and press New:
- Name should identify manufacturer, model and tray required (FX DocuPrint C3350 Tray 2).
- Bin type tick Input.
- PCL Escape enter the manual value for this tray (5) and press OK to see this in the list.
Go to and select Base Page, then Define, Properties of Base Page ... and select the Copy Control tab. On that tab, select Source then FX DocuPrint C3350 Tray 2.
Project Defaults
Project defaults are used to initialize newly created projects and when the stand-alone form is viewed using the preview options.
On the Project defaults tab, you can set the following Font usage and MICR options:
-
All - FormTrap uses a combination of True Type
fonts and printer-resident fonts when designing and building your
form. Once All is selected you can then set the
following options:
- Prefer True Type Fonts - defaults to True Type fonts on all new projects. FormTrap uses True Type fonts instead of printer-resident fonts when both are present i.e. font 'Arial' exists both as a printer-resident and system based True Type font). Prefer True Type Fonts is the default option. Uncheck this box to default to printer-resident fonts on all new projects.
- Always build fonts - when FormTrap cannot find either the True Type or printer-resident fonts it will substitute the next best fit for the missing font. Check this box to ignore font related errors or when the exact appearance of text glyphs is irrelevant.
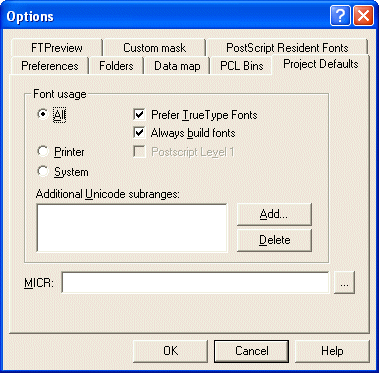
-
Printer - This selection is included only for support of obsolete
systems and equipment.
FormTrap uses only printer-resident fonts when designing and building your form. For obsolete fax solutions, once Printer is selected, you can then set the following option:- Post Script Level 1 - produces Postscript Level 1 output files. This option is used for obsolete faxing solutions that require Postscript Level 1 input.
- System - FormTrap uses only True Type fonts when designing and building your form. True Type fonts are installed in your Windows font directory.
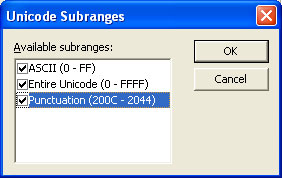
-
Add Unicode subranges - this allows you to include
additional ranges of character glyphs into your load (.ASC) file.
Subranges are supplied by TCG during the installation (Punctuation and Currency)
and on request (Greek as an example). To include Unicode subrange(s):
- Click the Add button. The Unicode subranges dialog box will open.
- Select from the list of available subranges and click the OK button.
- Entire Unicode implies long load and build times for the large set of glyphs, especially for Asian double-byte languages. Use this only if you have to (Production times are NOT impacted, size of the load file will typically increase for a single phrase form going from 3Mb, font Arial, Punctuation and Currency to to 70Mb for the same phrase in @Arial Unicode MS for Entire Unicode, with consequentual build and test times.
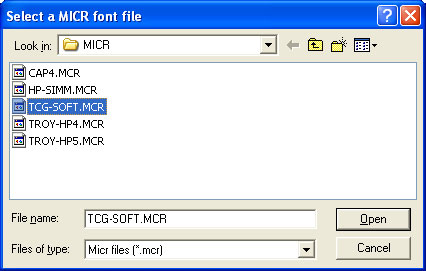
-
MICR - Select a default MICR file for all new
projects. The MICR box refers to the location of the MICR font file
you are using to generate the MICR line on check forms. The MICR
font is only available when using a PCL printer driver to design
and build forms.
- Click the browse "..." button and locate the MICR directory.
- Select the correct MICR file and click the OK button.
- If you are not producing checks (cheques) or you are not using the PCL printer driver you can ignore this option.
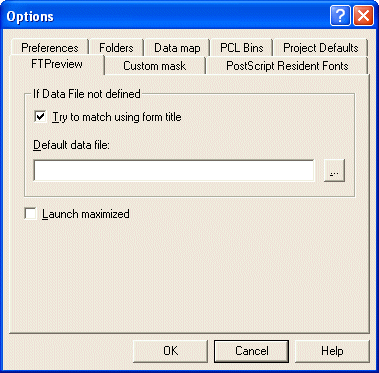
FTPreview
On the FTPreview tab, you can set the following options:
- Try to match using form title - FTPreview will try to find a data file which matches the title of the form. For example, if the form is named invoice.frm, FTPreview will look for a data file called invoice.txt or invoice.dat in the specified Input data files folder.
- Default data file - click the browse "..." button to select a default sample data file. If a data file has not been loaded FTPreview will use the specified data file as the default.
- Launch maximized - the FTPreview window will open maximized.
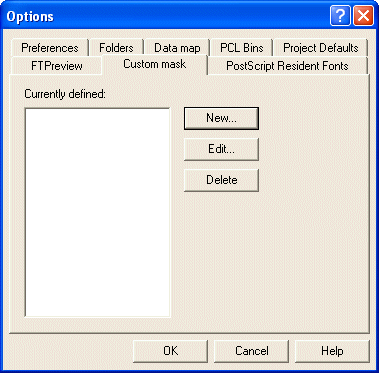
Custom Mask
On the Custom mask tab, you can set the following options:
- New - create a new custom amount mask. This is useful if you regularly use a currency format that is not available in the default list. The new mask will then be available in the list of mask types.
- Edit - edit the format of an existing custom mask.
- Delete - delete an existing custom mask.
More information on Creating Custom Masks
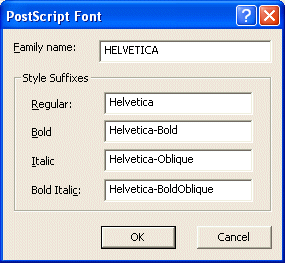
Postscript Resident Fonts
On the PostScript Resident Fonts tab, you can add additional fonts which can be used when designing a form.
The following options are available:
-
New - Use the New... button to
add a font to the available font list.
- You will need to determine the name the printer uses for the font you wish to add. You can find the font name by printing a list of the printer resident PostScript fonts from the production printer.
- Enter the Family name for the font and the Style suffixes for Regular, Bold, Italic and Bold Italic.
- Click the OK button.
- Edit - edit the information for an already available PostScript font. Select the appropriate font and click the Edit button.
- Delete - delete a PostScript font from the list of available FTDesign fonts. Select the appropriate font and click the Delete button.