| |
|
| Custom Masking |
 |
|
The custom mask allows you to create your own format to tailor the way
information is displayed on the finished form. This function is
especially useful for displaying codes, constructing special currency
formats and incorporating text within variable data.

|
| Create a custom mask |
|
To create a custom mask:
- Create a new variable text object or edit
an existing variable text object.
- On the Link to field
dialog box, select Custom from the Mask as
menu.

- In the Mask text box
type in the mask required, using the underscore to mark the exact
placement of the characters from the original field. It is important to
enter enough underscores to represent the maximum field size.
- Click the OK button
to apply the mask.
Using suppression you can then remove
unwanted spaces or leading zeros from your data field.
|
|
| Top
|
| Custom mask with left suppression |
|
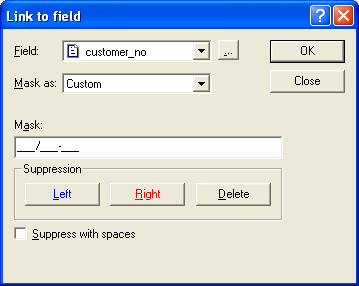
In the following example we remove leading zeros from the customer
number field.

To create a Custom mask with left
suppression:
- Create a new variable text object or edit
an existing variable text object.
- On the Link to field
dialog box, select Custom from the Mask as menu.


- To delete the suppression, highlight the
area of the suppression mask you wish to delete and click the Delete
button.
- Check the Suppress with spaces
if you want to replace suppressed characters with spaces. This is
useful if you want to keep alignment as is.
|
|
| Top
|
| Custom mask with right suppression |
|
In the following example we remove a trailing space from the company
name variable.

To create a custom mask with right
suppression:
- Create a new variable text or object or
edit and existing variable text object.
- On the Link to field
dialog box, select Custom from the Mask as
menu.

- In the Mask text box
type in the mask required, using the underscore to mark the exact
placement of the characters from the original field. It is important to
enter enough underscores to represent the maximum field size.

- In the Mask text box,
highlight the area where the trailing spaces will appear. Click on the Right
button. The highlighted area will change color. The purple highlight
indicates the start of the suppression and the red highlight indicates
where right suppression will occur.
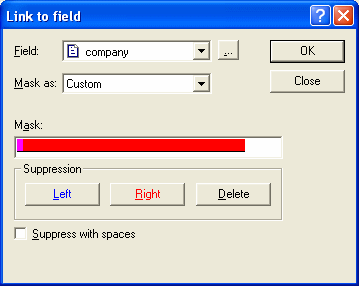
- To delete the suppression, highlight the
area of the suppression mask you wish to delete and click the Delete
button.
- Check the Suppress with spaces if
you want to replace suppressed characters with spaces. This is useful
if you want to keep alignment as is.
|
|
| Top
|
|
|
|
