| |
|
| Beginner's Guide |

|
|
This guide is an introduction to setting up a
FoD-OMR form, with
different OMR zones (Matrix and Random, single choice and
summation), other objects together with how to arrange
these objects on the form.
|
| Page Setup |
|
First
step is to set up the page in File
> Page Setup.
Set Paper to A4 or Letter and Grid to 48 channels. If you have a 40
channel scanner be prepared to adjust position of channels down to fit.

Save the form name it "Beginner's Guide"
or another appropriate name.
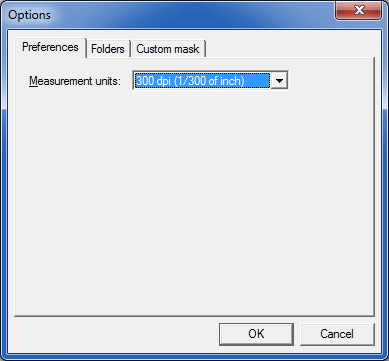
In Tools
> Preferences
set the
Measurement
units
to 300
dpi (1/300 of inch).
This allows for both 48 and 40
channel scanners without decimals (channel spacing is 50/300 for 48
channel, or 60/300 for 40 channel, other items items adjust to
fractions of 48 and 40 channel measurements.
|
|
| Top
|
| Timing Lines |
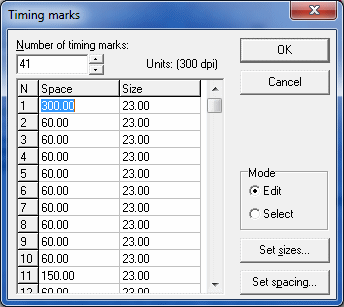
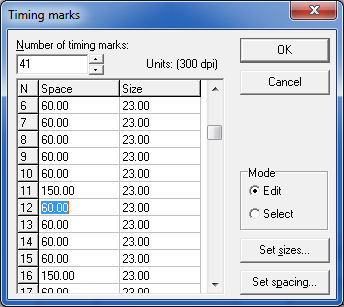
To define the timing lines select Timing Lines  in the Draw toolbar. In the
dialog box, set Number
of timing marks to 41. in the Draw toolbar. In the
dialog box, set Number
of timing marks to 41.
The Timing Marks appear on the right side of the form in red.
Right-click
anywhere
on the form and click Apply
changes.
You can now modify the spacing of the timing marks by right-clicking
the timing marks and select Properties.
In the dialog box you can change the space between the timing marks
as well as their size.
Change the spacing to create
one group of 10, five groups of 5, one of 4 and the last 2 together.
Set the spacing evenly between the groups.
|
|
| Top
|
| Student |
|
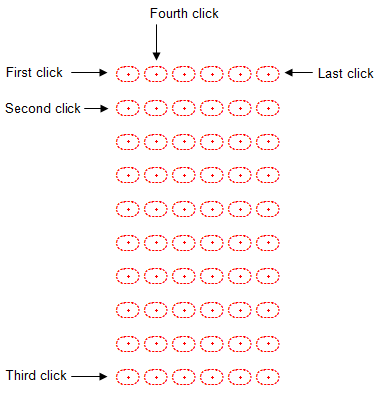
Matrix Zones for responses are define by a series of mouse
clicks. You define
start point (1), then spacing between choices (2), number of
choices (3), spacing and orientation between elements (4), and finally
number of elements (5).
To set up a student numberof six digits:
- Click the Matrix Zone
 button. The mouse
pointer changes to a cross-hair. button. The mouse
pointer changes to a cross-hair.
- Select where to "click" to start the
zone. You can see Row and Column in the Status Bar (bottom
of the window).
- Click the second choice of
the first element
to define the element's orientation (along columns or rows) and the
spacing between choices.
- Click the last choice of the first element to
define the number of choices.
- Click the first choice of the
second
element to define the spacing between elements.
- Click the first choice of
the last element
to complete the zone.
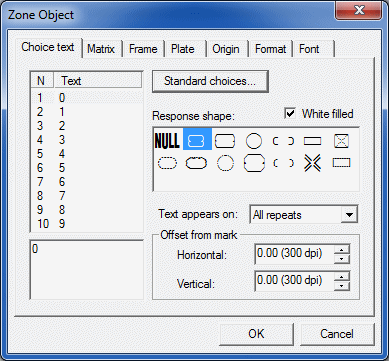
- Open the properties of the zone, either
by double clicking the zone, or by right clicking and selecting
Properties.
- From the Response shape area,
select the shape to the right of NULL and set White filled.
- There are standard text choices to choose
from, accessed from
 .
Choose Numbers (from 0). .
Choose Numbers (from 0).
- In the Matrix tab, check
the Horizontal origin
is
40
and Vertical origin
is 1,
change them if different.

Jump to the Plate tab to change
the color of
the response text. FoD OMR regonizes only "three colors": Black,
Blind
(shown as Red) and Other
(shown as Blue). More
information on blind and other colors is available in the manual.
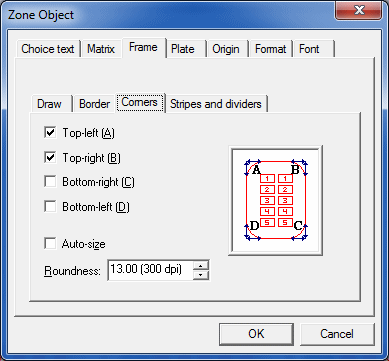
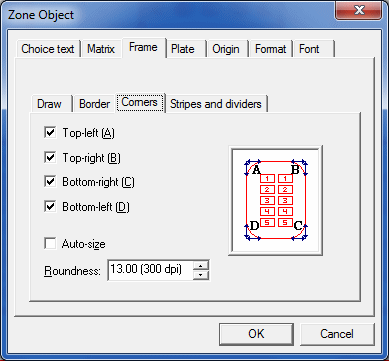
- On the Frame tab
mark all three choices. This tab frames the zone with borders,
internal lines and shading.
- On the Border tab, untick Auto offsets
and change the settings to those shown below. Width should be
increased to
the second thinnest option.
- In the Title Line
 dialog box you create
the line dividing the Title space from the choices. Set the Placement to
Top,
untick Auto distance
and set to 25. Width should
be increased to the second thinnest option. dialog box you create
the line dividing the Title space from the choices. Set the Placement to
Top,
untick Auto distance
and set to 25. Width should
be increased to the second thinnest option.
- On the Corners tab, select Top-left (A)
and Top-right (B).
Untick Auto-size
and set the Roundness
to 13.
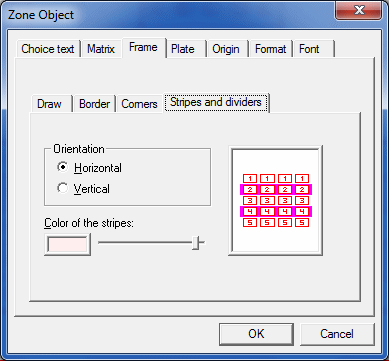
- Finally set the stripes that
divides the elements for visual clarity. These should be Vertical and a
light shade (via the Slider - move to the left).
- Leave the settings on the Origin and
Format
tabs as is, and select the Font
tab.
- Select Arial font and change the Size to
6.
Click OK.
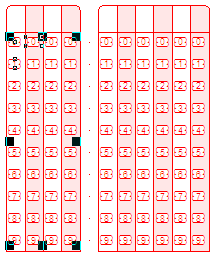
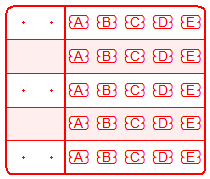
The zone should now look as below.
|
|
| Top
|
| Test |
|
There are a number of ways to copy a Matrix
zone:
Copy,
Paste and change the values in the Matrix tab
Copy, Paste, Drag and Resize
Use Ctrl+Drag to make the copy, then Resize
Copy and use Paste At  to make the
copy, then Resize Make, then delete each new Test field until
you have used all methods please.
Copy
and Paste
and change the values in the Matrix tab:
- Copy
and Paste
the Student zone. The zone is placed on top of the already existing
zone.
- Open the Properties of the
zone and in the Matrix
tab change the Horizontal
origin to 34,
and set Repeats,
Count
to 4.
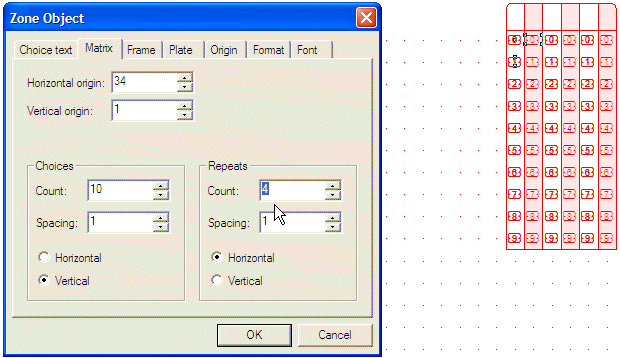
- Leave the other settings as is.
- Click OK.
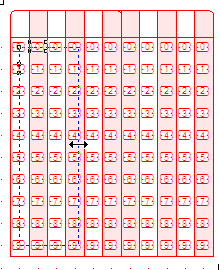
Your two zones should now look
as below.
Copy, Paste, Drag and Resize:
- Copy
and Paste
the Student field. The field is placed on top of the already
existing field.
- Drag the zone to the left until only one
repeat overlaps and let go of the mouse.
- Select the middle black handle on the
right side and resize the zone to 4 repeats.
Use Ctrl+Drag to make the copy, then Resize:
- Hold Ctrl while dragging the zone to the
left. This creates a copy.
Copy and use Paste At to make the
copy, then Resize:
- Copy the zone.
- Select the Paste At button in the toolbar.
- The mouse pointer changes to a hand.
- You can check the Row and Column in the
Status bar to ensure the position is correct.
|
|
| Top
|
| Number the Question Answers
(Individually) |
There are several ways of adding the text Q1-Q125 to the
form. Two ways are explored in this guide. The first one we will
explore involves creating Text
objects.
Create a Text Object:
- To place the first Text object, select
the
 tool. The mouse pointer changes
to a cross hair. tool. The mouse pointer changes
to a cross hair.
- Drag the mouse to create the Text Object.
The Text Object dialog
box opens.
- Type Q1-Q5
in the Definition
tab.
- On the Format tab set the Horizontal
Alignment to Right.
- On the Plate tab, set
Plate to Black.
- On the Font tab set the
Font size to 9.
Click OK.
- The Text object is not aligned correctly.
This
is because Line Spacing is set to Single
(default
setting), but it can be changed on the Format
tab. The text should be spaced to the same as the space between the
Timing Marks.
- Check the space set between the Timing
Marks by accessing Properties
by right-clicking the Timing Marks.
- Open the Format tab in the Text Object Properties.
Set the Line
spacing Type to Exact. Set Exact spacing to
60.00.
The spacing now matches the Timing
Marks, and with this method the Text object can
be copied across and down the form
to create the 25 (5 by 5) text objects containing Q1-Q125. To retain even
spacing, use Nudge.
See below for a
guide to this.
This method present a problem when spacing between the
Timing Marks is changed.
- Open Properties
of the Timing Marks again.
- On the 13th Timing Mark, change Space to 100.
- The spacing of Timing Marks has changed,
but the Text has not.
- Change the Timing Marks spacing back as
before.
Using Nudge
to
arrange Text Objects
Nudge (using the keyboard arrows to move objects on the form) can be
used effectively to arrange objects as needed. Nudge Distance  can be accessed through the
Tools toolbar or menu. For
this exercise use Difference
between selected objects. can be accessed through the
Tools toolbar or menu. For
this exercise use Difference
between selected objects.
- Select two question zones one apart in
both directions, and press (nudge). Select Difference between selected
objects and click OK.
- Now any selected object(s) can be moved
by the "nudge" distances, using the arrow keys, in any direction.
|
|
| Top
|
| Number the Question Answers
(using zones) |
|
|
Using "NULL"
or "no shape" zone objects to create Q1-Q125
is reliable and quicker as it avoids aligning text objects and
automatically adapts to response position changes. To do this we will
create a zone
with the response text offset
from the mark. Response text can be offset left (negative)
or right (positive) of the zone center.
The
zone is a single line of 25 choices with no repeats ("short" zone) and
is created, as with the other zones, with a series of mouse clicks. For more
information of "short" zones see the manual.
Creating a 5 choice zone to start, then
extending it, will make the process easier to understand.
Create a "short" zone:
- To create a zone with 5 choices in one
column three mouse clicks are needed.
- Select the Matrix tool. Click the top A
in the top left zone.
- Click the second A, and finally the fifth
A as below.
- To "finish" the zone with 5 Choices and
no Repeats,
right-click the mouse anywhere on the page.
- Open the Properties of the Zone.
- Set the Response shape to NULL, and type Q1-Q5 in the Choice
text box.
- Click OK.
The
new zone is placed on top the other and has the same Properties as the
previously created zone, so there are a few changes to make.
- Open Properties
again.
- Choice
text needs to move left, a negative Horizontal offset.
Set to -30.00.
- Untick White filled.
- Leave Matrix
tab as is.
- On the Frame tab, untick Border, Dividing lines, Stripes. Settings
for the underlying zone remain as is.
- On the Plate tab, set the
plate to Black.
- On the Format tab, set the Horizontal Alignment
to Right.
- On the Font tab, change the
Size
to 9.
- Click OK.
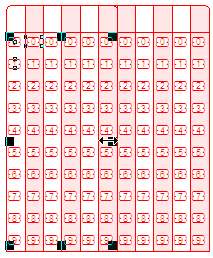
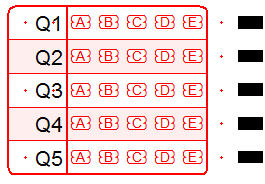
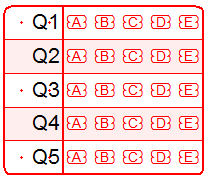
Your two zones should now look like below.
Rather
than repeating this for each of the 25 zones that make up the 125
Questions, extending it over 25 rows saves time and effort.
- On the Matrix tab, set the
number of Choices
to 25.
- On the Choice text tab,
there are now 25 choices. Extend the numbers as shown on the sample PDF.
- Click OK.
- Copy
and Paste
the zone to the other columns, using one of the methods tried above in
the Test
section.
- Renumber the zones as per the sample PDF.
- Your form should now look as below.
|
|
|
| Top
|
|
|
|
|