| |
|
| Beginner's Guide |

|
|
You can insert data from files into zone, text and
barcode
objects on
your form, and dynamically merge the data when the form is printed. For
this form we'll use a data file to pre-fill the Student Name, Student
Number and Test Number.
Save this .txt file
to the folder where the form is saved.
|
| Date |
|
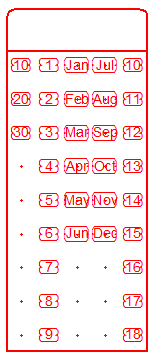
The Date field is made up of 4 OMR zones. Mth is a Random
Zone, the other three Matrix. As the Random zone can't be assigned a
frame, we will use a combination of frames and graphic objects to
create this group.
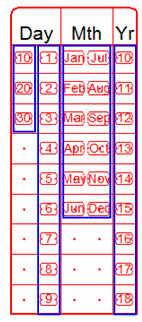
- Create a "short" zone of 9 choices starting
in Channel 16,
Row
1.
- Open Properties
and name the choices 10
to 18.
- Check that the settings are as below.
- On the Frame tab untick all
three choices.
- Click OK.
- Select the Random zone tool
 from the toolbar. This zone contains 12 choices in two rows, each
created with individual clicks. Create two rows of 6, in the order
below.
from the toolbar. This zone contains 12 choices in two rows, each
created with individual clicks. Create two rows of 6, in the order
below.
- Name the choices in short month format (Jan, Feb ... Nov, Dec).
- Set the Response shape to
the second right from NULL.
- On the Format tab, set Horizontal alignment
to Center.
- Click OK.
- Create a "short" zone with 9 choices in Channel 19.
- Open Properties
and select Numbers (from
1) in
 . .
- Change the Response shape back
to the shape to the right of NULL.
- On the Frame tab, select Border, but untick Dividing lines and Stripes if selected.
The Border of this zone will be used to cover the other three zones so
the Offsets
need to be changed. Change the settings as below.
- In Title
line set to Top.
- Click OK.
- Create a "short" zone of 3 in the empty
Channel.
- Open Properties
and name the choices 10,
20,
30.
- Click OK.
- Since the zone containing the Frame for
the group is a single column, it's not possible to use the Dividing lines in
the Frame tab.
Two Lines (Graphic
Objects) can be used to create the Dividing lines instead.
- Select the Vertical line tool
 in the toolbar. The mouse
pointer changes to a cross hair. Draw a line between "Month" and "Day". in the toolbar. The mouse
pointer changes to a cross hair. Draw a line between "Month" and "Day".
- Extend the line to the bottom and top
border. You can change the Nudge
distance to 1 (300 dpi)
for fine tuning the placement.
- Open Properties
and change Plate
to Blind.
- Copy and Paste the line, or draw another
line, and place it between "Month" and "Year".
- Add three text objects ("Day", "Mth",
"Yr") in the title space above the group. If they appear in Red,
change Plate
to Black
in Properties.
|
|
| Top
|
| Constant text objects |
Add the constant text objects above the Date, Test and Student
zones. The Alignment tools are useful in placing these objects. More
information on Alignment Tools can be found in the manual.
Aligning objects:
- Select
 .
While holding the left mouse button drag across the screen to place
your text object. This opens the Text object dialog box (Properties).
In Definition type "Student". .
While holding the left mouse button drag across the screen to place
your text object. This opens the Text object dialog box (Properties).
In Definition type "Student". - On the Format tab set the Horizontal Alignment to Center.
- Set Plate to Black.
- On the Font tab, set Font size to 12. Click OK.
- Toogle the Alignment toolbar, if not already open, by clicking
 . This opens the Alignment toolbar . This opens the Alignment toolbar  . This can be docked in the toolbar menu, or floating. . This can be docked in the toolbar menu, or floating. - Select the "Student" text object and click
 , the mouse pointer changes to a hand. This alignment tool uses two clicks to center an object between the two selected points. , the mouse pointer changes to a hand. This alignment tool uses two clicks to center an object between the two selected points. - Click the horizontal edges of the Student zone.
- The text is now centered over the zone.
- Do the same for Test and Date zone.
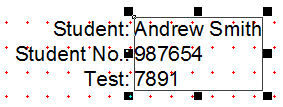
Add the text field "Student: / Student no.: / Test:"
- Use the text tool to create the object.
In Definition type
the three lines.
- Set Horizontal
alignment to right in Format
tab. Set the Line
spacing to Exact:
60 (300 dpi).
- Set Plate
to black.
- Set Font
size to 12.
- Click OK.
- With the Text object selected click
 , the mouse pointer changes
to a hand. Select the left edge of the first Q1-Q125 zone. The
object aligns with the other zones in the left column.. , the mouse pointer changes
to a hand. Select the left edge of the first Q1-Q125 zone. The
object aligns with the other zones in the left column..
- Click
 and align the object to the
Student
zone. and align the object to the
Student
zone.
To create the sample text (to be substituted from the data file):
- Copy and paste the text object. The
copied object is placed on top of the first object.
- Open Properties
and change the Horizontal
alignment (on the Format
tab) to Left.
This moves the text object. If it is too close to the constant text
object, use Nudge to move slightly to the right.
- Open Properties
again. Change the text to a sample of the text that will appear on the
form.
|
|
| Top
|
| Preparing Data Files |
FoD-OMR can use data files in three distinct 'formats':
- Fixed data files have
the same data field always at the same location on each line in the
data file.
- Delimited data files
have their fields separated by a character known as a delimiter.
- Delimited named data
files are like the Delimited data files in that
the fields are separated by a delimiter. They also have a header line
which allows more flexibility in forms design.
This Beginner's Guide uses a
Fixed data file. More information on Merging Data
Files can be found in the manual.
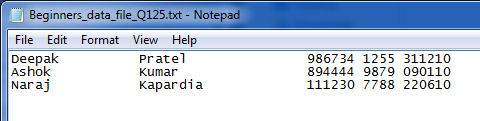
Open
the text file provided. The fields in the file all have the same
starting point, but not always the same length. Student and Test (and
Date,
not used in this form) are always the same length, but Name varies
in length.
You can set up the fields prior to linking, or as needed by
creating fields through linking objects (text, zone, barcode objects).
To set up the fields before linking:
- You need the first 4 records of this
file, Name, Surname, StudentNo and Test.
- Count the characters (and space) for each
field to determine the length of each.
- In the Tools menu, select External data....
- This opens Field definitions
dialog box. Click New.
- FoD-OMR asks you what type of input data
used. Select Data fields
are of fixed size.
- The Field
dialog box opens. Type in your first field, "FirstName", and set the
length of the first record in the text file. Click OK.
- Click New
again and add "Surname". The Start
point changes automatically to accommodate the fields created prior.
- Add "StudentNo" and "Test".
- Your fields are now available to link.
The symbol to the left of the name is a green
"broken link". This signifies that the field hasn't yet been linked.
- Below
are the instructions on creating fields as you need them and it's also
the method of linking previously created fields to text. Delete the
fields created, as we'll recreate them later.
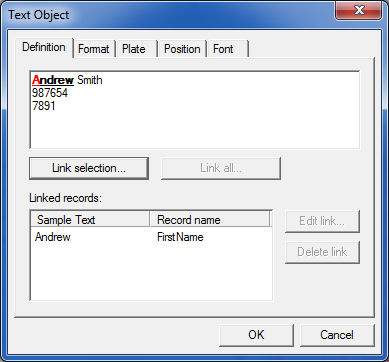
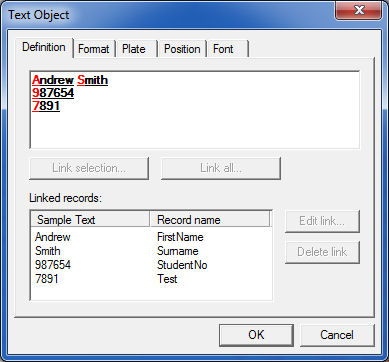
- Open the sample text Properties. Mark the
"FirstName" only, and click Link
selection...
- This opens the Link to field dialog
box. If you have created the fields previously they will appear in the
drop down menu.
- Since the fields were deleted, the list
only contains the predefined fields (such as Page, Date etc).
- To add a field, click
 next to Field, this opens
the Field
dialog box. Type FirstName
and change the Max
Length to 16. next to Field, this opens
the Field
dialog box. Type FirstName
and change the Max
Length to 16.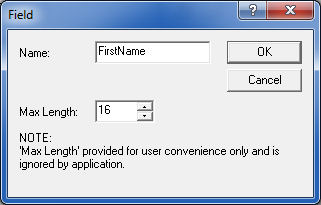
- Click OK.
Click OK in
the Link to field
dialog box.
- The linked text is highlighted and the
field is available in the Linked
records list, where you can edit the link (or delete it).
- Link the remaining fields.
- Click OK.
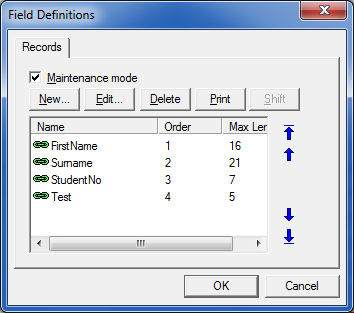
- Open External
data... from the Tools
menu. The "broken link" has now changed to an "unbroken link" symbol.
- If you have added the Fields in a
different order to how they appear in the data file, you can change the
Order
and Max Length
in Field Definitions.
|
|
| Top
|
| Student |
You can now use the Fields created to pre-fill some of the OMR zones.
- Open Properties
of the Student zone.
- Linking a zone to a field is done in the Origin
tab of the Zone
Properties. Default setting is Constant. To create
a new field, click the button and
proceed as before when creating a field. As we have already created StudentNo, select it
from the drop down menu.
- On Encoding
method select 0-9.
- In Encoding
value, you can enter a sample value, to see on the form
(prior to printing) how the printed form will appear. Enter 6 numbers
to "pre-slugg" the zone.
- Select the Standard size of Encoding marks.
- If the Student number should appear in
the Title line of the zone, copy the "Student" text object and place it
in the title line. Change the definition to a sample Student Number.
- Link the text to StudentNo.
- It's not possible to change the spacing
of the text substituted from a data file, so the Student Number is
centered in the Title line.
- Link the Test zone to the
Test record.
|
|
| Top
|
| Barcode |
|
To add a barcode:
- Click
 , and drag the mouse pointer
where you want to place the barcode. The Barcode dialog box
opens. , and drag the mouse pointer
where you want to place the barcode. The Barcode dialog box
opens.
- Set Symbology
to Code 2 of 5 int.
- Click Link
all... and link to Test.
- Click OK.
- Adjust the size of the barcode if needed
by dragging the black handles that appear around the barcode when
selected.
- Adjust the position of the barcode if
needed.
|
|
| Top
|
| ID Mark |
The ID Mark
is used by the scanner to determine how to read the form.
- Create a single Matrix Zone to the
immediate left of the second last Timing Mark.
- In Text
type "ID Mark".
- Set the response shape to the shape to
the shape immediate right of NULL.
- Set a negative Horizontal
offset (-100.00) to place the text to the left of the
zone.
- Untick all choices on the Frame tab.
- Set Plate
to Blind.
- On Origin
tab, set Field to Constant,
the Encoding Method
to Y/N, and
set Encoding value
to Y.
- Choose Custom in Pre-defined sizes.
Set Width to
45,
and Height
to 23 (the
same as the Timing Marks).
- Set Font
size to 9.
- Click OK.
|
|
| Top
|
| Binary Codes Decimal
1,2,4,8... |
|
Binary numbers are used to show data on OMR
forms.
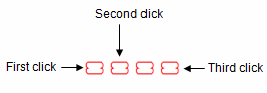
To create the 20 Choice "short" zone directly underneath the Question zones, you
need three mouse
clicks.
- Select
 from the
toolbar. from the
toolbar.
- Check the Status Bar to make the first
mouse click in Channel 45,
Row
36.
- Place the second click to the right
(Channel 46), and the final, making the count 20, in Channel 26, Row 36.

- Open Properties
and tick White filled if not
already selected.
- Set Offset
from mark (both Horizontal and Vertical) to 0.00.
- Check that the Response shape is
set to the shape to the right of NULL.
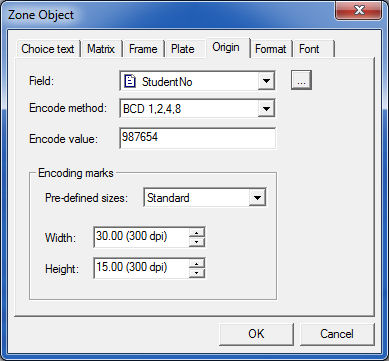
- Open Properties,
and select the Origin tab.
- Select StudentNo from the
drop down menu.
- Select BCD 1,2,4,8... in Encoding method, and
type in the sample value in Encoding
value.
- Add the Constant text "Binary:
Student987654 (6 digit maximum)". Use the alignment tools to place the
text.
|
|
| Top
|
| Binary Codes Decimal Same Plane Zone
(1, 2, 4, 8) |
|
This is another zone that can be used to
show data, or can be marked for single digits in less space.
When both Choices and Repeats are in the same plane (Channel or
Row), zones are called "Same Plane Zones". More information can be
found in the manual. This is set up in Properties of the
zone.
Set up a "Short" zone up of 4 choices. For this you need three mouse
clicks.
- Right click to finish the zone.
- Open Properties.
- Set the Response shape to
the fourth from NULL
 . .
- In select Binary encoding, 1-2-4-8.
- On the Matrix tab, check
the Horizontal origin
is set to 3,
and Vertical origin
is set to 37.
- Leave Choices:
Count
and Spacing as
is, and set Repeats:
Count to 6,
and Spacing
to 5. Make
sure Repeats
are Horizontal.
- On the Frame tab, leave all
three choices unselected.
- Make sure Plate is set to Blind.
- On the Format zone, set Horizontal alignment
to Center
and the Line spacing
to single.
- On the Font tab, change the
Size
to 6.
- Click OK.

- Open Properties,
and select the Origin tab.
- Select StudentNo from the
drop down menu.
- Select BCD 1,2,4,8 in Encoding method, and
type in the sample value in Encoding
value.
- Add the Constant text "BCD 1 2 4 8:
Student987654".
|
|
| Top
|
| Binary Coded Decimal Random Zone (1,
2, 4, 7) |
|
The last two rows of zones are best done by using a Random zone. For more
information on Random Zones see the manual.
- Select the Random zone icon
 . .
- With four mouse clicks create a zone of
four.
- Right click to complete the zone.
- As this is a Random zone you have to
right click and select Properties
to open the Properties dialog box. Open Properties.
- Select Binary encoding, 1-2-4-7 in .
- Check the Plate is
set to Blind.
- Click OK.
- There
is no tab available in Properties
to adjust the placement of the zone, so do this manually.
- Copy
and Paste
the zone until there are 6
groups of 4.
- As this is a random zone, you cannot
prefill this from a data file.
- Add the Constant text "BCD 1 2 4 7:
Student987654 (as single digit random zone)".
|
|
| Top
|
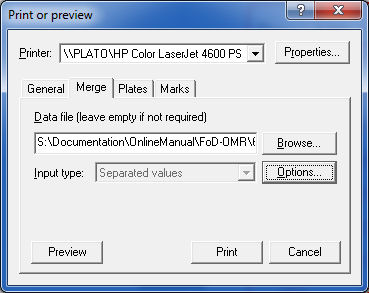
Printing the form with merged data
|
|
Now that all elements on the form have been defined, it's time to print
it with the data file.
The linked objects will be replaced by the
values in the data file. The data file used is defined in File menu, Print..., (shortcut
ctrl + p).

- Select the Merge tab.
- To define the data file used, click
 and find the .txt file
saved earlier. and find the .txt file
saved earlier.
- Confirm which printer to use, then click Print.
|
|
| Top
|
|
|
|