Quick Data Entry Tutorial

Quick Data Entry
Quick Data Entry is an optional FormTrap component. Each QDE form
defines the prompts, edits and logic to collect fields from an
independent keying session on any network computer or detached
computer, including notebook and pad computers. Fields are collected
in FormTrap XML format, allowing direct input back into FormTrap
forms. As is customary, the QDE program is fully integrated so you
can test new forms and print them during development. Once the QDE
form is complete, it is "built" and is then available from any PC to
collect data and print forms, with the XML file also available to
update your main DB.
This document is a series of tutorials to present gradually
increasing levels of complexity using documents that should be
useful to your business. The estimated times to complete each
section are included, please tell us how long it takes you, we will
then be able to update these estimates.
If you have forms you are prepared to contribute to the forms
available that would be appreciated.
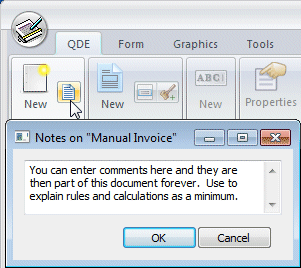
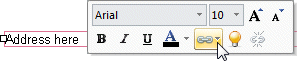
Send your contributed forms and any comments or constructive
suggestion to support@formtrap.com, and
please remember to document in Document Comments, as shown at the
right.
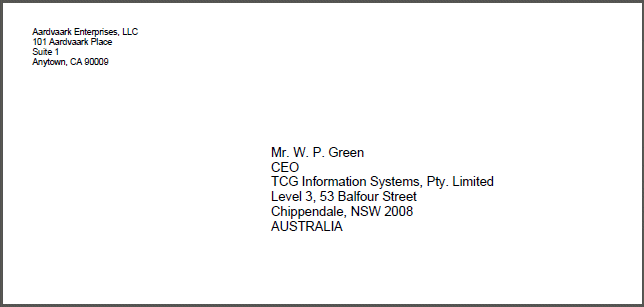
Envelope (5 minutes)
We'll start with an envelope, printing the address and who from (in
the top left corner).
Press New  to open a new document.
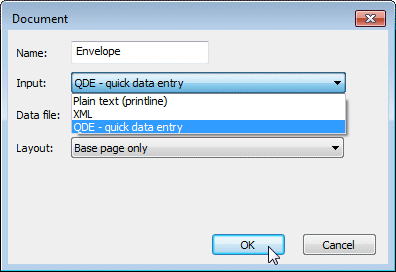 This is the resulting window:
- Name: key Envelope
- Input: select QDE - Quick Data Entry
- Data file: leave blank
- Layout: select Base page only and press OK to finish
Activate bottom left Document tab and double click SECOND
line (master area) to open master area properties.
All FormTrap QDEs have a master record, some may have additional
details (Invoice for example), we'll cover those later.
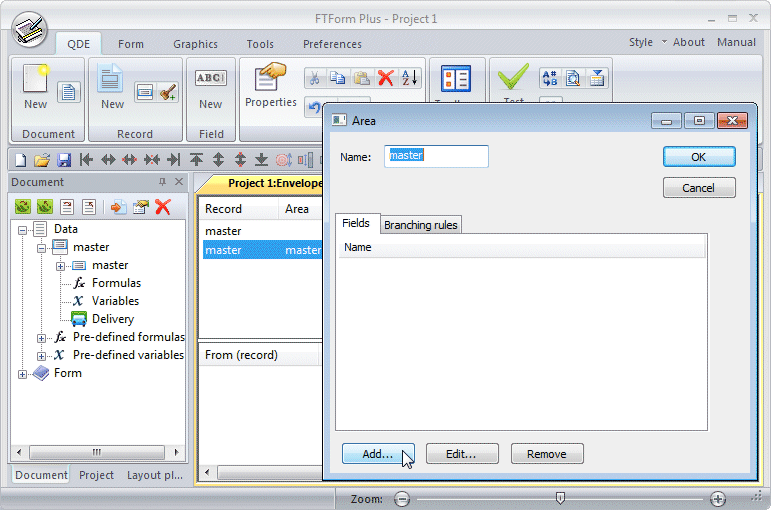
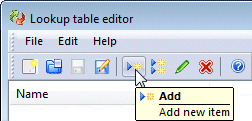
Go to the bottom and press Add ... to add a field. This is
the result and you can now define the first data field:
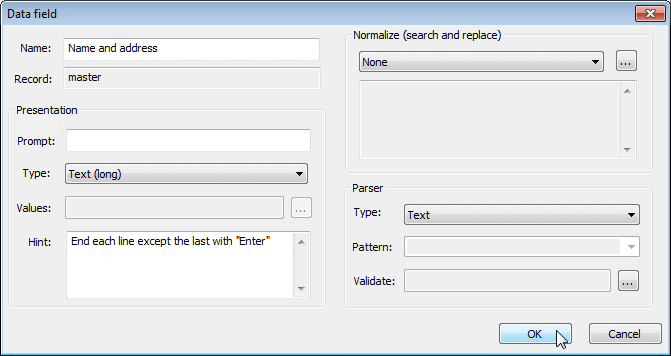
- Name: key in the name of this field, whatever you like.
- Prompt: is what the users sees in Data Entry, occasionally you may want a different (usually simpler) prompt.
- Type: select Text (long). This is long text where Formatting will line-break long lines.
- Hint: is optional and are instructions to the person keying the field. Key something so we can see this later in Data Entry. We're finished, so say OK to this window and the next. One field now appears under master, we'll run with this for the moment.
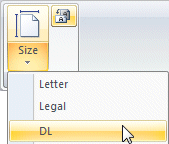 Select Form from the top of the area
  . From the left-top Page area, select Size
as DL (or whatever envelope you use) and click the Orientation
button to Size's right for Landscape. You should see an
envelope-sized empty image in the main screen.
. From the left-top Page area, select Size
as DL (or whatever envelope you use) and click the Orientation
button to Size's right for Landscape. You should see an
envelope-sized empty image in the main screen.
Select Toolbox from below the left-hand column, then select Long
text. Drag and drop it where you want the LAST line of
address, the screen should end up as shown.
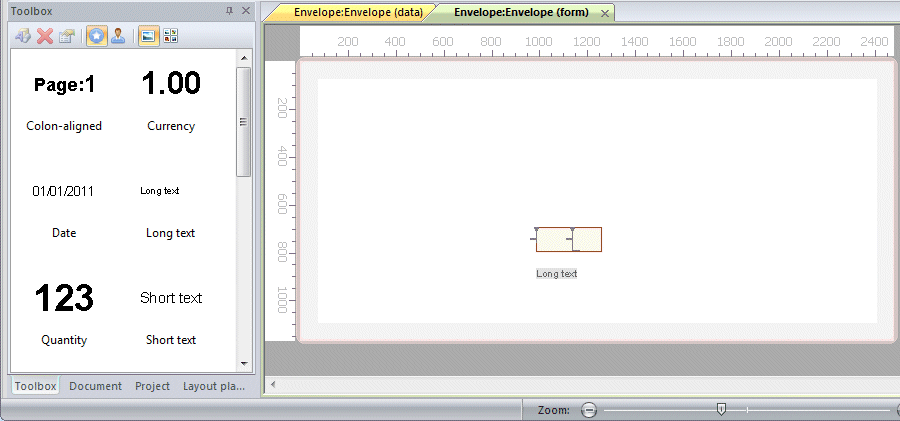
Do the following to the Long text object on screen:
- Press Mouse Right and select 12-point and whatever font you want to see.
- Drag the object out to size by pulling the right-hand handle until it is close to the right end of the envelope (maximum length of the text object).
- Replace Long text with Address here or similar so you know what the field is (this doesn't matter for this very sparse form but does when forms get busier).
- Highlight the text, then right click and select Link to
 (left, above).
 - A window opens, select Master and Name and address (middle above).
- Finally press the Vertical Alignment button and select Bottom (right above).

OK, we're ready to test the form via QDE.
Select Data  and Test
 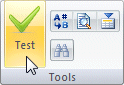 to open QDE.
Select Envelope and press Next  .
.
Hover over the question to see the hint. Hints are help for the QDE
user and can be as large as required.
Key in the Name and address. Press , then press  to see the result.
Congratulations, that's your first QDE form completed.
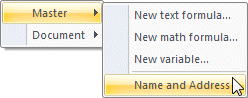
Lookups (Sent From Company)
We'll put "sent from" as a lookup object at top-left. Lookups are
integral to FormTrap, and you will re-use this many times in all
kinds of forms.
Still on the Data screen choose New (Field)  and answer as below:
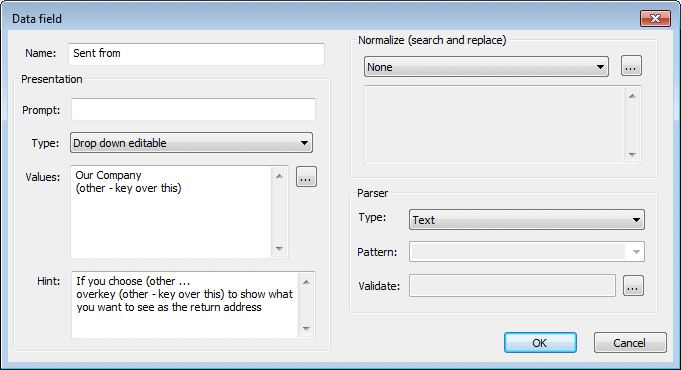
- Name: is Sent from
- Type: select Drop down editable
- Values: collects drop down list choices. Enter as shown, each on a new line, with (other - key over this) as the final choice. See later for handling multiple companies' envelopes.
- Hint is very important as the user WILL need instructions on
what to select. Key something like what is shown.
Press OK to finish.
Select master (top line) and double click to open Properties.
Select Formula tab and press Add ... and select Concatenated
text field (text) from the two choices on offer.

Answer as shown:
- Name: is Our Address
- Concatenate: key Our Address.
- Substitution: select Substitute from lookup table, then press OK.
Let me explain. The result of Concatenate is Our Address. This key is searched in the lookup table, and when matched, the value is substituted. Rather than read about Lookup Table now, follow what is below to set up Our Address in the lookup table:
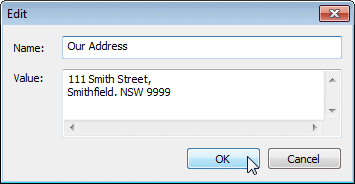
 Open Lookup Table Editor from the FormTrap group.
- File, Open the file lookup.xml (a small file is provided) and select Add New Item.
- Add as shown (exact spelling required for Our Address),
then File and Save, go back to FTForm Plus.
Select Form , Toolbox and drag and drop Long text
to the top left corner, then do the following to it:
- Press Mouse Right and select 8-point and whatever font you want.
- Pull the end of the field to the right until it is long enough (roughly 1/3rd of envelope width).
- Replace Long text with KeyedLooked-up or similar so you know what both fields are (one for keyed, the other the lookup value).
- Highlight Looked-up text, then right click and select Link
to ,
master and Our Address. This will "source" from
the lookup.

- Highlight Keyed text, then right click and select Link
to ,
master and Sent from. This will "source" from the
keyed information.
- File, Save to save the lookup file with the new entry.
Repeat Data, Test and see the finished envelope.
What you will have is BOTH "Sent Froms" shown - obviously NOT what
we want. If you do not see the Lookup Table entry check the above,
you probably miss-spelt either the our address Formula or the Lookup
Table key. Note that you can view the XML file and save it (do so
for re-use).
Top
Rules (conditional printing)
We'll put rules on the two "sent froms" so we print just the one, depending on what we selected. This is quite common in FormTrap forms and allows alternate presentations.
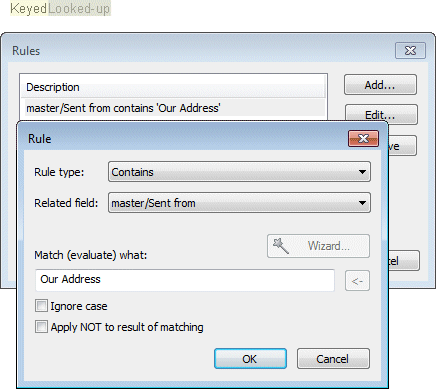
Start by highlighting just Lookup-up (NOT the blue
highlight, you must highlight the text itself).
Once it is highlighted, select Rule (this icon ![]() ) and select Add… from the Rule window,
then answer as shown.
) and select Add… from the Rule window,
then answer as shown.
This tests the answer to the drop-down being Our Address,
which is what we have to look up).
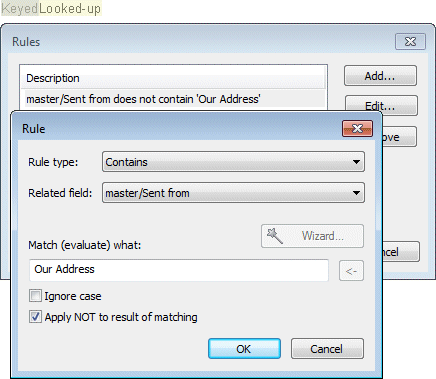
Now highlight Keyed and enter the reverse Rule (ie with Apply
NOT to result of matching ticked.
Now we print the keyed value.
Finish by selecting Data, Test and key one of each
type, viewing the results.
Complex Letter
We're going to view complex letters, then show how little
is keyed in the corresponding QDE, then finally explain what the
form design looks like.
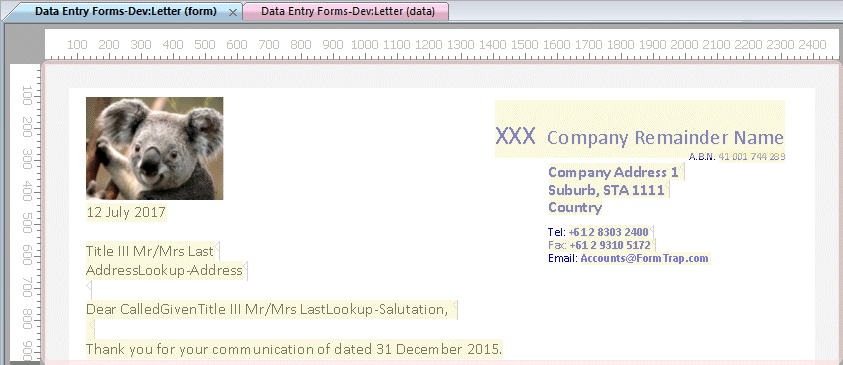
Look at the set of letters here:
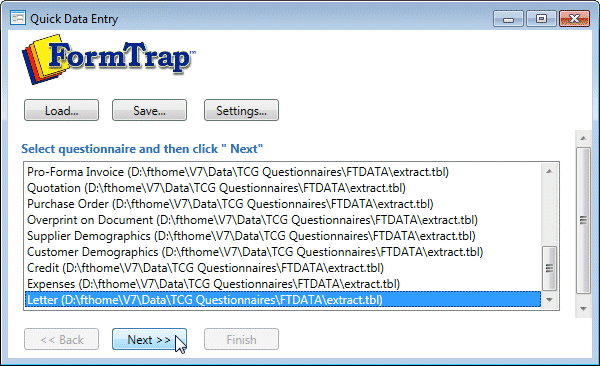
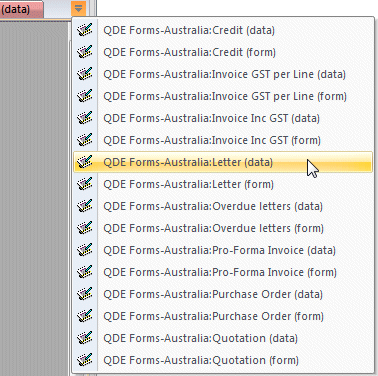
Select the QDE shortcut, 
Select Letter (last in the list) then .
This opens the Master screen (this document has a Master - where
top-of-page items are collected, then a choice of detail records
that form paragraphs, then a standard trailing record that provides
the letter end). Follow this and we'll explain later.
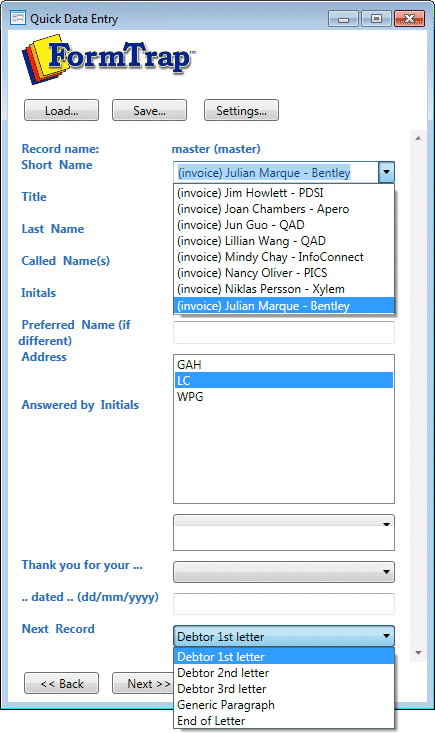
- Select (invoice) Julian Marque ... from the first choice list.
- Select any of the Answered by Initials.
- Select Debtor 1st letter from the final choice list.
- Press
Debtor 1st letter record screen shows and collects these:
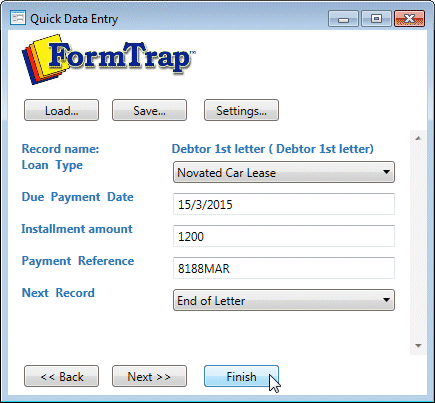
- Loan Type - select one
- Due Payment Date is keyed as dd/mm/yyyy.
- Instalment Amount is keyed without the dollar sign, no commas and you may leave out cents.
- Payment Reference
- Select End of Letter
- Press
Press ,
when the screen with the choice  pops up, select that to see the letter.
You can see the effect of Debtors 2nd letter and Debtors 3rd letter
by pressing  until the Master question Next Record shows, then select the
other Debtors letters, answer the prompts and view those other
forms.
until the Master question Next Record shows, then select the
other Debtors letters, answer the prompts and view those other
forms.
We'll finish with the Change of Address, so press until you're back at the first page and answer
the last few questions as shown.
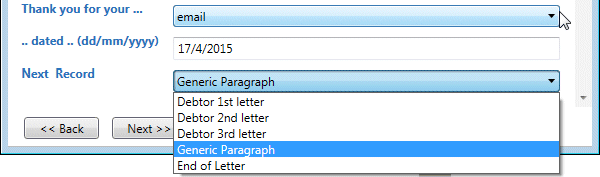
The Paragraph record has short-hand paragraph selections,
then offers (at Next Record) the opportunity to select
additional paragraphs.
Select Address Change and finish by selecting End of Letter,
or  , then .
As you can see, this one form is capable of answering most if not
all of the queries and administration your organization requires,
and at incredible speed. Let's now take the hood off
and see what is underneath in the Form Design.
Letter Form Design
Load QDE Forms. If you cannot see
 then go to the end of the line and select Active Files to
see the full list of files,
then go to the end of the line and select Active Files to
see the full list of files,
 ,
then select Letter (form).
,
then select Letter (form).
Layout at bottom left shows the individual layouts. Double
clicking or by selecting a layer shows this ![]() to indicate the active layer which shows in the
main display.
to indicate the active layer which shows in the
main display.
Position and appearance is implemented by pressing  at the top of layout.
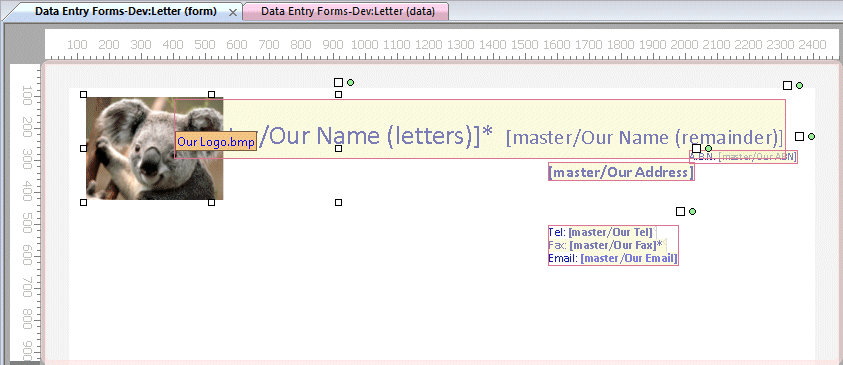
The letter starts with a Report Header. The our company
items are linked to Formula (Concatenated text type)
which call in Lookups to substitute for the text you see on the
form. our company formula and lookups are widely used in
most forms, and are changed once only to IMMEDIATELY apply to all
forms.
January 1st, 2016 we were able to change our
company name and address with ONE set of lookup changes, for ALL
forms.
The logo is handled the same way, with the screen shot showing the
link name Our Logo.bmp. You can use your logo (you'll need
.bmp format) by copying it over Our Logo.bmp in the
substitutions folder. If your organization requires additional
address lines (being in the UK for example), you would need to move
the Tel: section down.
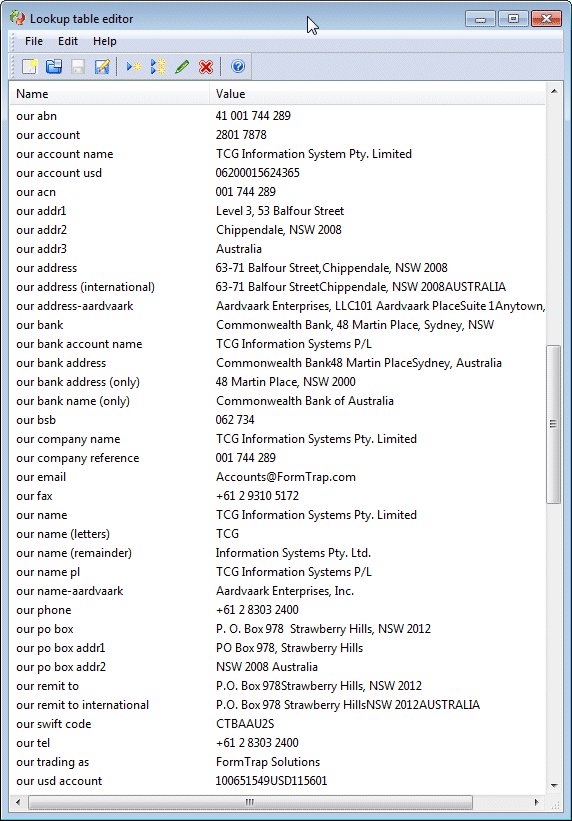
Press HERE
to see the our xxx Lookup Table entries we use which include
bank accounts, address variations between local and overseas
documents, direct deposit information etc.
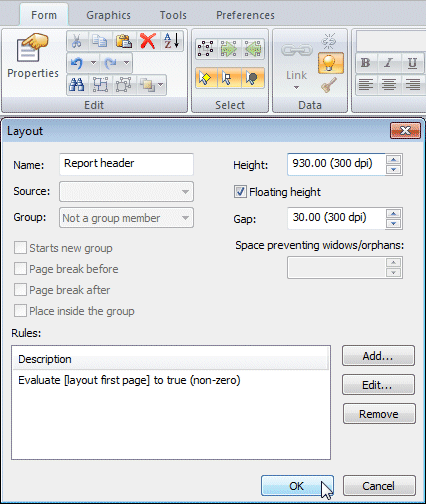
Report Header is defined like this, where Floating height
ticked resets vertical space to what is required, with a 1/10 inch
(30/300) Gap after.
 This block is sourced from either Lookups (see next section to see
the lookups for Short Name customers) or from the fields
that follow Short Name.
This block is sourced from either Lookups (see next section to see
the lookups for Short Name customers) or from the fields
that follow Short Name.
The Header includes this text, omitted on most letters: 
Remove empty lines via this icon ![]() . This removes lines with no data (and if not
selected, vertical space size remains exactly Height).
. This removes lines with no data (and if not
selected, vertical space size remains exactly Height).
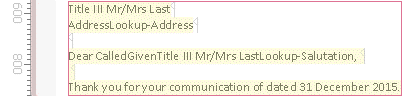
Looking at Address, the fields are either Title, Initials,
Last Name and Address or the single field Lookup
Address, which is looked-up based on Short Name. Both the
Address and Salutation use Rules to control what is printed, please
ask Support@FormTrap.com if you
require further details.
To experiment with the Salutation, please omit Short Name
and fill in the other replacement fields.
Lists and Lookups
 This
is the our xxx section of the lookup table and contains
entries used in other forms (such as our swift code for
Telegraphic Transfer from overseas). These are fixed lookups (there
is no data in the names).
This
is the our xxx section of the lookup table and contains
entries used in other forms (such as our swift code for
Telegraphic Transfer from overseas). These are fixed lookups (there
is no data in the names).
You can convert these to include data (where you run more than one
company) by adding data to the end, see this entry for an example:
our address-aardvaark
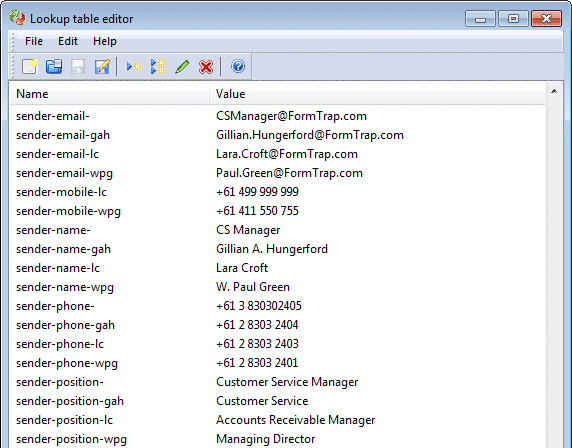
These are sender-type-iii lookups.
These add the selected Answered by Initials to the end to
form the full key, however partial entries without the key are
included and used to select "defaults" where the prompt is
unanswered.
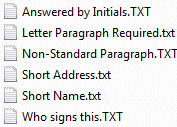
The files that provide choices for prompts may be EXTERNAL
simple .txt files, named with the field name for general use
over different forms, or named with field-form name for use
in one form only. Changes and edits therefore require no change to
the form, with these files names in the Substitutions folder
providing choice lists for this form:
Business Forms
We use QDE forms every day in the office. Our invoices, PO's Quotes
and other documents produce good looking PDFs that are emailed out
and archived, with just the totals transcribed to our Accounting
System. These are some of the other documents in the suite with
their main attributes, and you are welcome to experiment with them.
You can change them to YOUR business very easily by changing the our
xxx Lookup Entries and the Our Logo.bmp file to
replace with your logo.
Use QDE to look at the data files and to look at PDF documents:
- Manual Invoice allows payment in
various currencies, with payment by Australian Electronic Funds
Transfer or international Telegraphic Transfer.
View a complete USA invoice with everything HERE and an Australian Invoice that uses short name HERE. All calculations are automatic, as shown below.
Press to view the data entry files saved for these forms and use to see what is
keyed (which is surprisingly little.
to view the data entry files saved for these forms and use to see what is
keyed (which is surprisingly little.
- Value No Qty collects description and amount
- Value With Qty collects description, unit quantity, price per unit and unit description, then calculates amount
- Time x Rate collects description, time in hours and minutes and rate per hour and calculates amount
- Support collects support months, supported value (leave unkeyed to drop in the total so far) and support percentage and calculates amount. For other than 12 months, also calculates and shows the annual amount.
- Support Period collects a start of month and end of month dates
- Discount collects description, discount %, discount on amount (leave unkeyed to drop in the total so far) and calculates amount
- Comment collects comments
- ENDS does end of document calculations
- Credit is a negative version of the
Invoice, in a different color. See the form HERE and view the data file via and to see what is
keyed. Credit does not have the expansive features of Debit as we
use very few of them.
- Quote presents a full quotation and
allows either an added-up quote or, when the quote includes
options, presents a quote without total.
View a long quotation without total here HERE and a short, with total quotation HERE.
Press
to view the data entry files saved for these forms and use to see what is
keyed (again, surprisingly little).
Quote also includes a lot of manual calculation embedded in the form, with these as the detail record types:
- Value No Qty collects description and amount
- Value With Qty collects description, units and price per unit and calculates amount
- Time x Rate collects description, time in hour and minutes and rate per hour and calculates amount
- Support collects support months, supported value (leave unkeyed to drop in the total so far) and support percentage and calculates amount
- Support Period collects a start of month and end of month dates
- Discount collects description, discount %, discount on amount (leave unkeyed to drop in the total so far) and calculates amount
- Comment collects comments
- ENDS does end of document calculations, if called for by the Master field Print total of Quote
- Pro-Forma is used mainly for support
renewals, for existing customers.
View a Pro-Forma HERE.
Press
to view the data entry file for this forms and use to see what is keyed (again, surprisingly
little), using much the same detail lines.
- Purchase Order we order mainly from
just two suppliers, connected with our Optical Mark Reading
business (fill in the bubble forms - like census).
View two Purchase Orders HERE and HERE. These and the data files illustrate how we use lookups to fill most of the form.
Press
to view the data entry file for this forms and use to see what is keyed.
- TEK purchase order has lookups for the supplier and for Deliver To - we have a Melbourne one-man office which is responsible for most of our external POs.
- Scantron also uses two delivery points. We could run the product names from lookups, but with so few orders, it is not worth while.