Form Components
-
 Form
Components
Form
Components  Overview
of Document Structure
Overview
of Document Structure- Remove
Redundant Layouts
- Viewing
the Layout you Want
- Background
- Report
Header
- Report
Footer
- First
and Second Page Footer
- Page
Header
- Page
Footer
- Group
Layouts
- Modifying
Group Headers
- B/Fwd
and C/Fwd
- Detail
Layouts
- Explicit
Group Headers
- Leading
and Trailing Pages
- Duplicating
Documents
- Label
Printing
Form Components
Form components are selected according to the new Document, Layout pull down completed when the document was created for XML translation - HERE:
| Full | additional pages plus the document (e.g., leading Fax Header, PO document, trailing Terms and Conditions) |
| Standard (multi-page) | single document (PO for example) with different page layouts for the first, intermediate and final pages(see below) |
| Simple (one page) | Common layout for all pages, for documents that rarely exceed one page |
| Base page only | fixed layouts and details only (such as label pages and contractual) |
The selection populates the Layout Placement windows, shown
here for the selection Full, and as below for other
selections.
| Standard | omits Title and T&C pages |
| Simple | omits Page header and footer |
| Base page only | omits all except Background |
Layout placement includes ALL detail records defined in the XML
file.
Overview of Document Structure
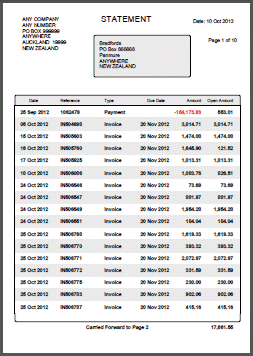
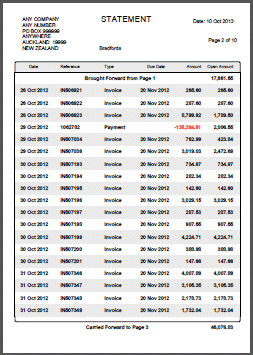
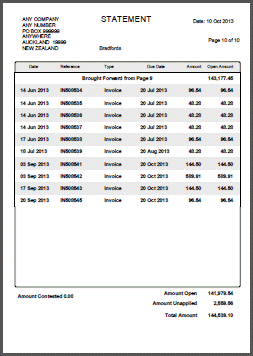
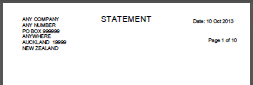
These are the first, intermediate and last page of a statement using the Standard (multi-page) selection above.
 All
pages show Background, with ...
All
pages show Background, with ...
 ...
Report Header overlaid on it for Page 1 only, as above, ...
or
...
Report Header overlaid on it for Page 1 only, as above, ...
or
 ...
Page Header overlaid from Page 2 onward, to give the shorter
page heading.
...
Page Header overlaid from Page 2 onward, to give the shorter
page heading.
 Group
Header (shown with the Brought forward here) appears
on all pages, lower on Page 1.
Group
Header (shown with the Brought forward here) appears
on all pages, lower on Page 1.
 Page
Footer prints on all pages except the last. The picture also
shows the last detail line and Group footer (white and short
last entry in the frame).
Page
Footer prints on all pages except the last. The picture also
shows the last detail line and Group footer (white and short
last entry in the frame).
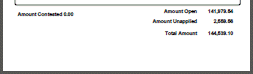 Report
Footer ends the final page.
Report
Footer ends the final page.
Detail entries defined in the Document (data) definition are included. You can add and delete "system" layout entries where required.
Remove Unused Layouts
Formatting initially shows all layouts defined in the XML extract
in the Layout placement list.
Definitions after Version 8.5 have the option of Redundant
Records (subsequent page headers, other "between page"
connector literals, etc.) which do not show in the Layout screen.
Versions prior and via the User deliberately doing so allow unwanted
detail records to be defined.
Immediately delete these from Layout placement.

To delete a layout:
- Select the layout via double click to
activate.
This symbol shows the active layout. Click anywhere on the main screen, then
delete
shows the active layout. Click anywhere on the main screen, then
delete 
- After deletion, the active symbol returns to the
top (Background) layout component.
- If you accidentally delete a layout, you can
undo by pressing the Undo
 button, or by pressing Ctrl + Z.
The picture shows the imminent deletion of the Unw ** Cont ** layout.
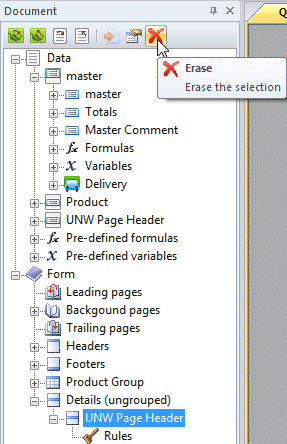
Records may also be deleted from the alternate Document list
by opening Form, then Details and pressing the
delete ![]() button at the top of the Document list.
button at the top of the Document list.
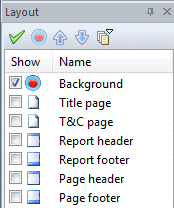
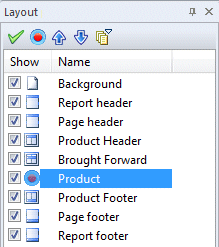
Viewing the Layout you Want
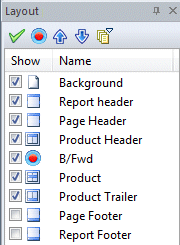 Screen shot shows the "layout components" for a Standard document.
You can change what you see using the top tools. Pressing the top
tick
Screen shot shows the "layout components" for a Standard document.
You can change what you see using the top tools. Pressing the top
tick ![]() implements changes and shows the new view in the (form)
screen.
implements changes and shows the new view in the (form)
screen.
Manipulate the order of layouts with up
and down arrows. ![]()
![]()
Tick boxes bring that layout to view on the (form) screen.
Double click a layer to view and make it current. 
The bulk of business forms show line items within a framework of information that applies to the whole document. This information occurs once only and comprises "header" and "footer" information such as totals. FormTrap allows producing the full header information once only, with less on subsequent pages for context (typically you will not require full billing and delivery address information on pages after the first). Similarly, the trailer information need only be shown once, normally last, with "carried forward" information on one line sufficient for preceding pages.
 If
the Layout tab is not visible, there are two possible
reasons:
If
the Layout tab is not visible, there are two possible
reasons:
Not selected from Toolbars
Off the screen. To resolve, try full screen or temporarily increase
the screen resolution to find Layout tab.
Select Toolbars then untick and re-tick Layout,
this makes Layout visible.
Background
This component appears on every page except Leading and Trailing pages.
Normally just the one Background set of components are defined,
however you may also define multiple Background components with
rules based on the copy being printed as "stamps" (such as Accounts
Copy), see HERE.
For Full and Standard document, main use is for the company name and
logos, although the page numbers and document numbers are usually
included. For Simple documents, this holds ALL heading and
trailing fields. For single transactions, this is the only form
component.
Source fields are from the master record, including master variables
and formula. Use Variable fields where company details may differ
and come from substitution files (see HERE).
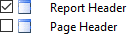
Report Header
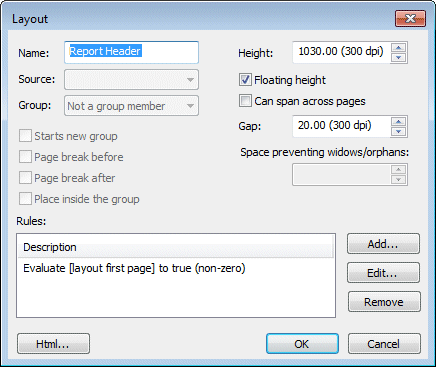 For Full and Standard document, this
component heads the first page. Define this "on top of" the
Background Fixed layout as both appear when printed. Source
fields are from Master, normally recipient and document details for
the entire document.
For Full and Standard document, this
component heads the first page. Define this "on top of" the
Background Fixed layout as both appear when printed. Source
fields are from Master, normally recipient and document details for
the entire document.
If the Report Header includes fields that may be from zero to many
lines of data (heading comments for example), tick Properties,
Floating height and set Gap as the distance to the
end of the Page Header from the last line of data.
The default rule for Report Header is taken from the list of system
numeric expressions.
While you can print the Report Header on all pages by removing the
rule, the better approach is to remove the Report and Page Header
entries entirely and to define these fields on Background.
Headers do not split across pages, hence Can span across pages
is never ticked.
Report Footer
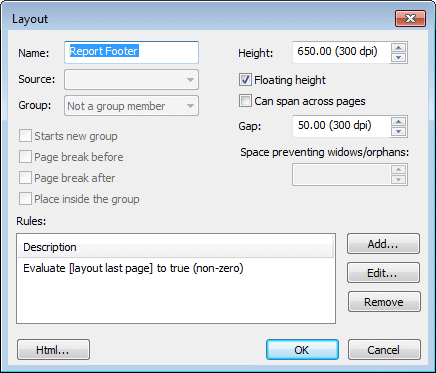
For Full and Standard document, this component ends the document
and carries trailing document total information. This component
shows at the bottom of the last page.
Footers normally do not split across pages, hence Can span
across pages is almost never ticked.
First Page Footer (and Second Page Footer for duplexed documents)
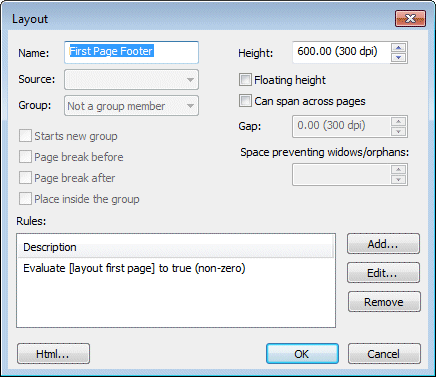
The default rule "last page" may be modified to place the Report Footer on "first page", as shown. This is common for checks (cheques) and for documents where the payment slip needs to be on the first page.
If this document is duplex printed, please immediately define a
same height Second Page Footer with the rule "second page"
to prevent loss of printed information when the first page footer is
a payment slip which is torn off for payment. The second page footer
normally contains constant payment instructions etc.
Can span across pages is almost never ticked.
Page Header
This is a smaller version of the Report Header containing less
data. The best way is to define it the same size as the Report
Header, then shift it just after the Background Fixed layout (use
Layout placement, ![]()
![]() and
and  Apply), then copy and paste all fields from the Report Header to the
Page Header.
Apply), then copy and paste all fields from the Report Header to the
Page Header.
Cut down the size by removing fields (for example, address fields)
and make the layout the minimum required. finally, adjust the size
by dragging the bottom of the layout up. The rule for the Page
Header is "Page Header" and should not normally be touched. Source
fields are from the Master record.
Page Footer
This component also draws at the bottom of the page and is used for
document continuity, presenting "Carry Forward" values on multi-page
documents. Rule value should not be changed.
Source fields are unlikely and are usually from Master. Page Footers
commonly include a master variable like running totals and
the system variable doc page next to show something like:

Group Layouts
Groups are user-generated. Groups surround detail layouts, providing
header and footer to selected details. Most commercial documents
(invoice for example) contain only one group containing details.
View a quick PowerPoint on how to construct a typical Group Header
and Trailer HERE.
Multiple group document would be telco bills with different
structures for different charge types (see HERE for more details).
Details are assigned into groups, or can be left ungrouped. Reading a detail defined in a different group closes any open group by printing the prior group's footer and the current group's header. Ungrouped details have no impact on the open group and are printed within that group. Typical "ungrouped" details would be "comments" to be included in the current group - regardless of the detail records for that group.
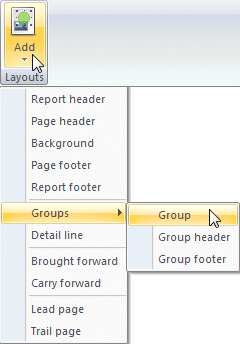
To add a Group Header and Footer, select Layout, Add, select Group, then Group from the pull-down as shown.
The recommendation is to add the minimum at this point, design the detail layout that belongs to this group, then come back and complete the Group Header. In this way, you will know where to set framing lines and boundaries. What you should do now is to complete the group windows below and leave the remainder until later. See the following section, Modifying Group Headers.
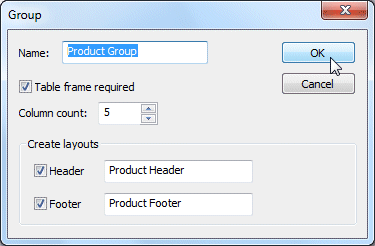
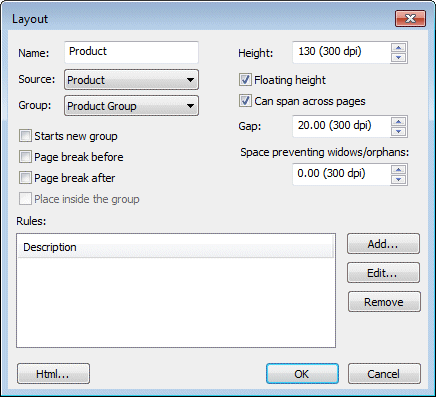
Name the group and tick Header and Footer to
create them. Name Header and Footer (eg Product
Header). If a frame is required, tick Table frame required
and enter the Column count (don't worry if you do not know,
this can be amended easily).
The Group Header and Group Footer are created in the Layout placement window and on screen.
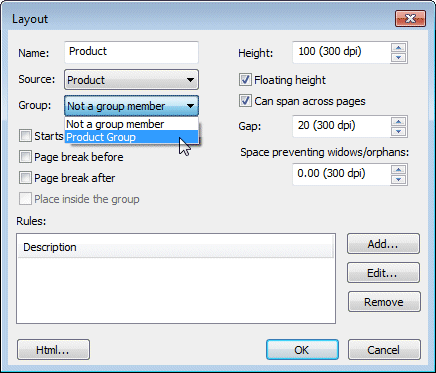
(Immediately select the details from layout placement that belong in this group, go to their properties and select Group as the group just created, details HERE).
While unusual, Groups with no Headers and Footers are possible (one example is maintenance invoices that start with a description of work done as comment lines). In this case create just the group layout and Group details into that group. This group will NOT appear in Layout placement, but will show in the Document window, Form section.
The Table for a Group Header is drawn with column lines included, as is the Group Footer. Group Headers and Footers are best defined after the Detail component has been defined. For information on the Table object, see HERE.
Group Headers define the frames and column titles.

Group Footers close the frame. It is possible (but unusual) for group footers to hold data.

Uncommonly, group totals may occur in the Footer, sourced from a master variable that totals the detail records for that group. Telco bills and similar bills with different charge groups do use this facility.

Table Footer properties determine the extent of the table frame below the last detail for the page via Expand to the bottom which ticked produces a table frame down to the foot of the page (allowing for Page Footers, and Report footers), unticked produces just the Table Footer itself.
Modifying Group Headers
Select Graphics from the top menu where the Table group has
table tools.

If you delayed finishing the group header until after completing the
main detail layout, make sure these are correct before continuing.
Make sure all detail lines have their (Layout, Properties)
Group set so they are part of the group.
Place the Group Header above the detail lines in the group with
Group Footer below.
The picture shows Brought forward also in the group, in
"correct" sequence.
Use Layout, Properties to tick Place inside the
group.
This is your starting position, showing the top of
frame being dragged up to the top of the Group Header.

The bottom of the Group Header is then dragged up to give the
required height (which can be adjusted via Properties).

Now select the frame (handles appear), then the left-hand handle ...

... press Mouse Left and drag it left ...

... and let go of the mouse to place it.

Do the same with the right-hand end (or instead turn it pink, then
use the right alignment tool  to position it).
Existing lines should be positioned using  or
or
or
or  .
.
Add new lines using ![]() which places a new line at the mouse position
when left is clicked.
which places a new line at the mouse position
when left is clicked.
Delete lines using ![]() and select the line to delete.
and select the line to delete.
This button and pull-down sets corner rounding.
These set colors, ![]() for Odd and Even Rows, Heading Background color and Frame Line
color.
for Odd and Even Rows, Heading Background color and Frame Line
color.
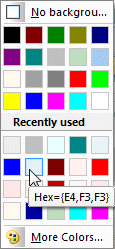
When one is chosen, it presents the color palette, shown to the
right.
This button ![]() swaps Odd and Even row colors.
swaps Odd and Even row colors.
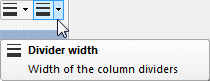
 These two set line width of the outer frame and inner lines from the
pull-down.
These two set line width of the outer frame and inner lines from the
pull-down.
Lines should be a fixed and consistent distance from data - to the
right of quantities and amounts, and preceding left aligned texts.
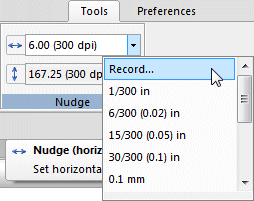
You can record a distance using Tools, Nudge and by
keying a value ...
... or by selecting Record ... from the  pull-down.
Align the line to the text object using or ,
then move it the recorded distance using left and right arrow keys.
Finally, put in your column headings and align to the data they describe.
Brought Forward and Carried Forward
 These are also "user included" components, used mainly for
inter-page running totals. Carried forward is rare, with the Page
Footer generally used for C/Fwd totals.
These are also "user included" components, used mainly for
inter-page running totals. Carried forward is rare, with the Page
Footer generally used for C/Fwd totals.
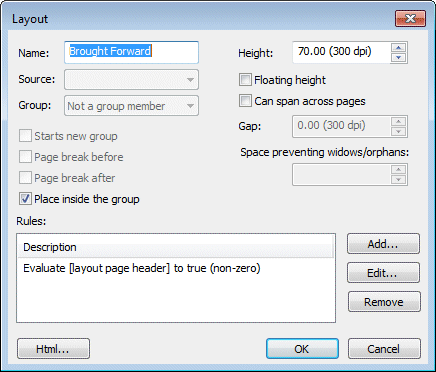
To include, select Add (from Layout) and Brought
forward (or Carried forward) from the drop down. On
the Brought Forward screen, set Name, Height and
tick Place inside the group (unticked, prints prior to the
Group Header - use this if you have multiple groups).
Source fields are unlikely and are usually from Master. Brought
Forward commonly includes a master variable like running total
and the system variable doc prior page to show something
like:

Detail Layouts
 Detail layouts defined in the XML file are
automatically listed in Layout placement. If a detail is in the list
and is NOT required, delete it.
Detail layouts defined in the XML file are
automatically listed in Layout placement. If a detail is in the list
and is NOT required, delete it.
Each detail layout should be included in a group, unless the detail
layout is ungrouped. Assign to a group via Properties, Group
and select the group, alternately select Not a group member.
For correct on-screen appearance, move the detail layout between its
Group Header and Footer, and if multiple details occur, sequence
them as they occur in data.
Ungrouped detail layouts print as they occur and have no impact on the current group (ie, if it is open, it remains open).
A Detail layout that indicates a change in group changes forces a
group break (ie closes the open group by printing the Group
Footer, and opens and prints the new Group Header).
This occurs even where either group has no Group Header or Group
Footer assigned. Grouped details without any Header or Footer are
normally extensive leading comments, such as work descriptions on
maintenance invoices.
Floating Height allows a detail record to have one to many
lines of data and is common for items that are sometimes present and
sometimes absent and for optional items such as product comment
lines or serial numbers. Gap allows a fixed distance after
the last line printed.
This shows products with Variable height detail lines via Lookups:
From Version 8.9, the additional tick box Can span across pages allows long details to break over a page boundary. Main uses are comments and serial numbers. This shows a ticked Can span ... result:
Explicit Group Headers
 This applies where the input file has
records that describe following data, effectively "grouping" that
data. For these cases, FTForm Plus provides the flag "Starts new
group" in detail records. This starts a group and prints a
group header which can incorporate data from the heading detail
record.
This applies where the input file has
records that describe following data, effectively "grouping" that
data. For these cases, FTForm Plus provides the flag "Starts new
group" in detail records. This starts a group and prints a
group header which can incorporate data from the heading detail
record.
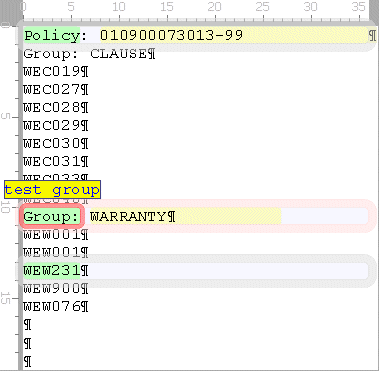
We'll use a sample file to illustrate, the file is part of an
Insurance Contract and is a list of paragraphs. Paragraphs are of
"types", in this file "Clause" and Warranty" types.
Equivalent structures are present in telco bills and other files
with explicit group headers.
Right is the data file, with the three record types defined.
- Master has "Policy" as the test and Policy Number as data.
- Detail Type has "Group:" as the test and Type as the heading data.
- Detail Paragraph has data "Paragraph", also tested non-blank to identify the record.
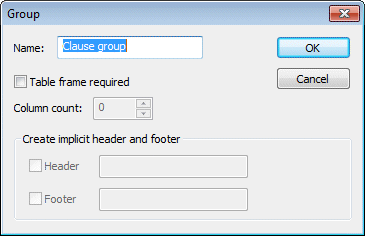
To set the group header Type records up as explicit group
headings, we need to define a Group layout, done by selecting (form)
view, pressing Layouts and selecting Groups then Group
from the pull-down. Fill in just the group name. If a Table Frame is
required, tick Table frame required, enter Column count
and tick Footer and name it.
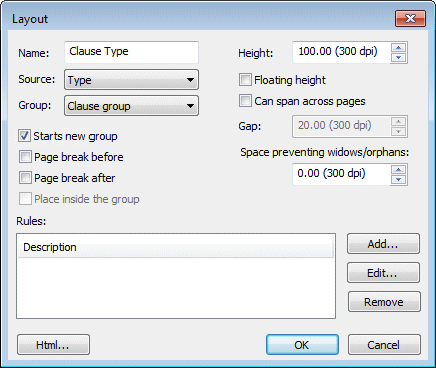
Select the detail Group Header and Properties, select from
the pull-down Group:, to assign this detail to the group and
tick Starts new group. You can now define the Explicit Group
Header layout fields and can modify the table as required.
You should now set other detail layouts in this group to be members
of the group.
If you forgot to add the Group Footer, select Layouts, Groups,
Footer to set up the Group Footer.
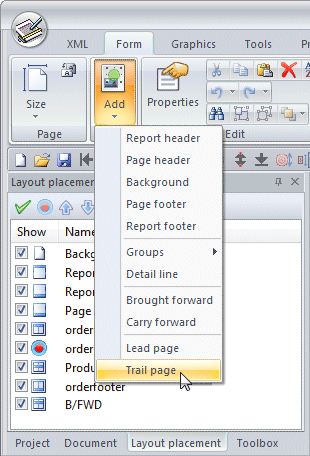
Leading and Trailing Pages
Leading and Trailing pages are user-generated additional pages.
Leading pages are often Fax Cover Sheets and Trailing Pages are
often Terms and Conditions pages with Purchase orders and Invoices.
Leading and Trailing pages have access to all Master and Document
fields and are the full size of the page.
To add a Leading or Trailing page, go to Layout and select New,
then Lead page or Trail page.
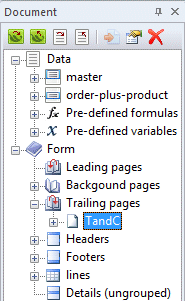
You can view Leading or Trailing pages in the Document layout, Form
subsection.
Duplicating Documents
(Version 8.16 and after)
Duplicate documents are printed when the master Variable copy_count is greater than 1, with copy_count copies printed.
Copy Collated (is the default), with Page collated
(NCR Paper) selected via the Page area Printing Options  button,
see further down.
button,
see further down.
Copy collated uses stamps to differentiate copies and draws from one input bin and may optionally output copies to different output bins. For a two-page, 3 copy document, output is Copy 1, Page 1, Page 2; Copy 2, Page 1, Page 2; Copy 3, Page 1 Page 2.
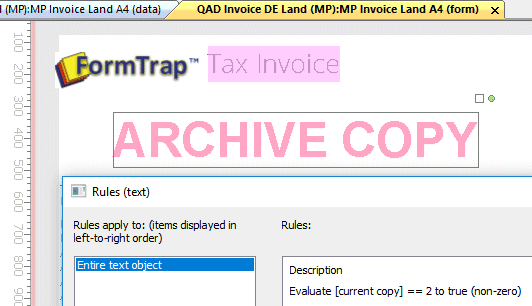
Copies may be stamped (stamps are user-generated Background
texts or logos and are normally in a light, faded color). Multiple
stamps may be defined either "on top of each other" or from a single
literal with all variations with each copy literal printed with a
rule each that specifies which copy prints which stamp (using the
pre-defined variable current copy - see details HERE).
Stamps should use the Edit area,  Set drawing order icon to Send to back, where
individual objects are used.
Set drawing order icon to Send to back, where
individual objects are used.
This shows a stamp for the second copy (ARCHIVE COPY) with it's
rule.
Where output is PostScript or PDF output, text may be angled (PCL prints only at 90 degree orientations).
Notes on Page Numbering with Copy Collated Documents:
Overall Page Current numbers each of the copies from 1 with Overall Page Last as pages per copy. Numbering re-starts for each copy.
Doc and Job Page Current increase over the number of copies.
Doc and Job Page Last is all pages for all copies, hence a 2-page document with 2 copies has 4 as the ... Page Last value.
Page collated (from Version 8-21 and after) is normally for NCR paper, drawing each copy from separate input bins, with output to one bin. For a two-page, 3 copy document, output is to a single output bin as Page 1 from Bin 1, Bin 2, Bin 3; Page 2 from Bin 1, Bin 2, Bin 3.
Stamps cannot be used.
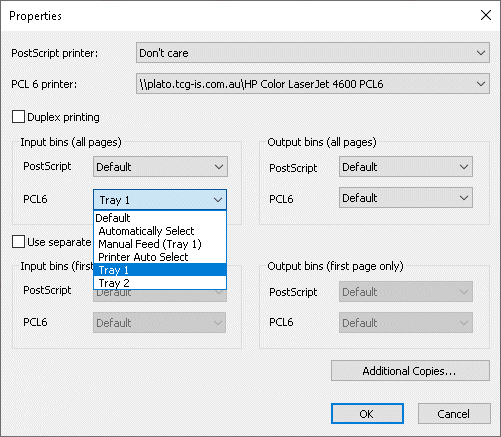
Select the Properties screen from the Printing options
icon in the Page
area .
Ensure input bins are defined before the Properties screen as either or both of PCL Bins or PostScript Bins need to be defined (note that PDF output cannot select bins, hence CANNOT be used for page collated output).
Select the bin for the first copy, from the first group (below the Duplex printing check box).
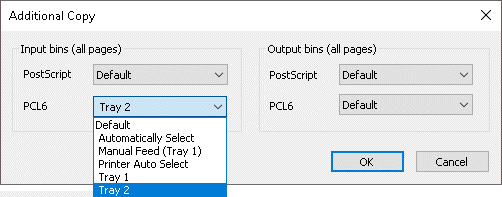
Press Additional Copies ...to see the Additional Copies screen below:
![]()
Add ... copies and for each copy, select the input bin from
the resulting Additional Copy screen.
For NCR Paper, normally Copy 1 is white and non-reactive on the
front; and the last copy non-reactive on the back. Intermediate
copies are reactive both sides.
FormTrap Server doccpy.exe to Duplicate Documents
Please read about this filter HERE, use this to duplicate an XML file to multiple different format forms in FormTrap Server.