Objects


 Appearance
of Text
Appearance
of Text- Rules
- Linking
Fields
- Substituted
Text using Formula
- Selecting
Linked Fields
- Sometimes
Present or Absent fields
- Tabs
in Text Items
- Indented
Paragraphs in Text Objects
- Horizontal
Alignment of Text Objects
- Vertical
Alignment and Line Spacing
- Word
Wrap
- Font,
Size, Color, Highlight Color
- On
Screen Icons
- Text
Manipulation
- Nudge
- Defaults
for Multiple Countries
- Formatting
Dates and Numbers
- Special
Characters in Text
- Regex
Rules for Text
- Arithmetic
Rules for Text
Objects - Text
Text objects are the most complex in FTForm Plus. Create by selecting something close from the Toolbox, drag 'n drop to the layout. These samples are in Toolbox:
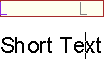
- Short Text left aligned single text item.
- Long Text, left aligned, line-wrapped. You can Copy and Paste long texts in from Word or key in directly.
- The next three use "pages printed" as the data source field, and have thousand separator , (comma) and decimal separator . (full stop) and are set for US English as the locale.
- Colon-aligned, right at the colon (following title) with left aligned bold data. Example text is "Page: 1".
- Currency for money amounts, is leading $, right aligned at decimal (separator), comma as thousands separator, two decimals, sign trailing, zero shown as $0.00.
- Quantity is right aligned at decimal (separator), comma as thousands separator, sign leading, round to three decimals and truncates trailing zeroes to one digit as the minimum, zero shown as 0.0.
- Date formats to your locale (country conventions), and shows as 1/1/21. Data source field is today's date, and output format will be: (USA) M/dd/yy. See here for how to format dates.
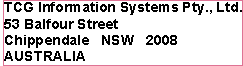
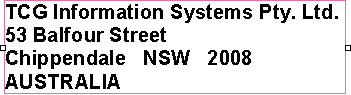
Appearance of Text on Screen and Edit Content
Text shows like this when selected.  The right square handle may be used to move text with
the mouse
The right square handle may be used to move text with
the mouse
(nudge is preferred, see here
as this moves the object horizontally or vertically only).
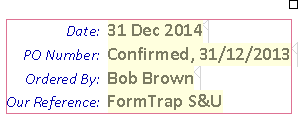
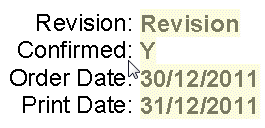
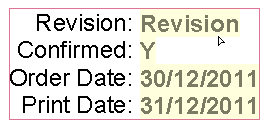
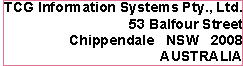
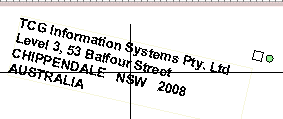
 Text shows linked data highlighted in light
yellow (or your color, see here).
Text shows linked data highlighted in light
yellow (or your color, see here).
In this example, data are PO No. (1234567) and Revision (1) and Confirmed (y).
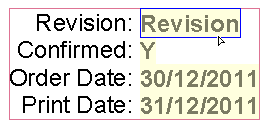
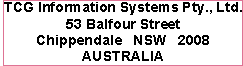
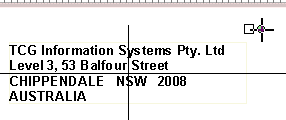
 To
edit content of a text block, select the object (text block
shows an outer thin red frame) and double-click at the point you
want to edit. This example shows ready to edit between Te
and xt.
To
edit content of a text block, select the object (text block
shows an outer thin red frame) and double-click at the point you
want to edit. This example shows ready to edit between Te
and xt.
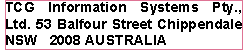
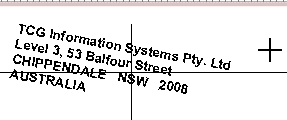
 Content edits may or may not apply to linked
data, depending on where the keying occurs. This shows keying
before, in the middle of, and after a linked object of 7 digits. BETWEEN
is now part of the linked text (which will be replaced). BEFORE
and AFTER are constants.
Content edits may or may not apply to linked
data, depending on where the keying occurs. This shows keying
before, in the middle of, and after a linked object of 7 digits. BETWEEN
is now part of the linked text (which will be replaced). BEFORE
and AFTER are constants.
Text linked from Data - ![]() and
and ![]()

 The Link
 ![]() icon links data to text. Link lists the data
fields available, including system fields (page counts, etc.). Data
may be linked to the entire text object by clicking once (which
outlines in red) then Linked, or ...
icon links data to text. Link lists the data
fields available, including system fields (page counts, etc.). Data
may be linked to the entire text object by clicking once (which
outlines in red) then Linked, or ...


... character(s) within the object may be highlighted, then Linked.
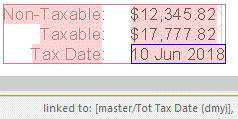
The blue rectangle shows the a field.
The Status Bar (bottom of screen, right) shows linked to: and the source field name master/Tot Tax Date (dmy).
Rules
Rules may be defined for layouts and objects within layouts. Objects appear only when their rules are satisfied.
For Text objects, rules may be defined for entire or part(s) of the object. This is specific to text objects.
- Rules for a text object - removes the entire object when rule is not satisfied.
- Remove empty lines
 button (within Text area) removes lines within
the text object where no data exists for that line, floating
following lines (up, down or to center). This example shows the
definition and result where the fax field is absent from input
data.
button (within Text area) removes lines within
the text object where no data exists for that line, floating
following lines (up, down or to center). This example shows the
definition and result where the fax field is absent from input
data.
![]()
![]()
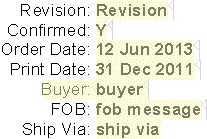
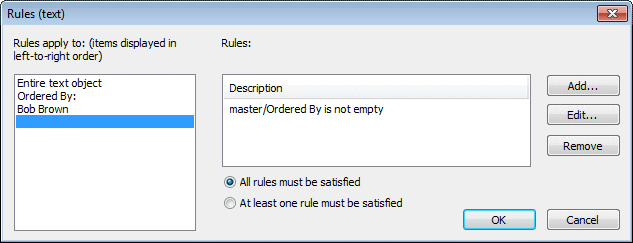
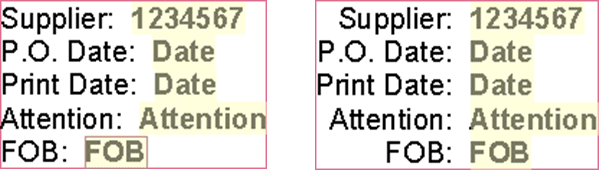
- Rules for a portion of a text object removes that portion if the rule is not satisfied. Use to remove constants entirely where data is not present (example shows absent data for both Buyer and FOB. Constant FOB: has no rule and is shown, while Buyer: has a rule and is eliminated).
This pressing defines a rule for the entire object.
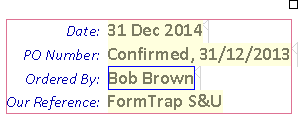
This pressing
ALSO defines a rule for the entire object, blue highlight DOES
NOT restrict the rule to just the blue highlight portion.
This pressing
defines the rule for just the highlighted characters (and may
include linked and unlinked text, and punctuation).- This shows the resulting set of
character-based rules, with the rule for the End-of-Line marker
shown.
Define Rules for the entire text object or selected portions via
the Rule ![]() button within the Data area of the toolbar.
button within the Data area of the toolbar.
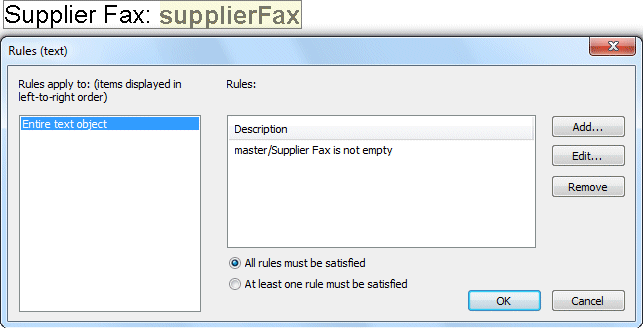
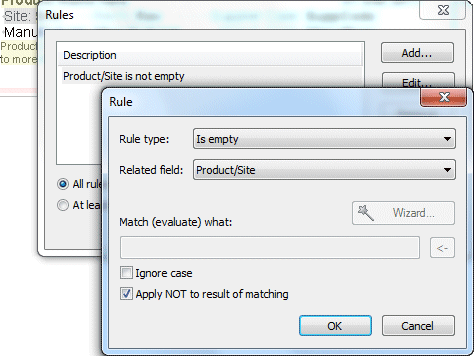
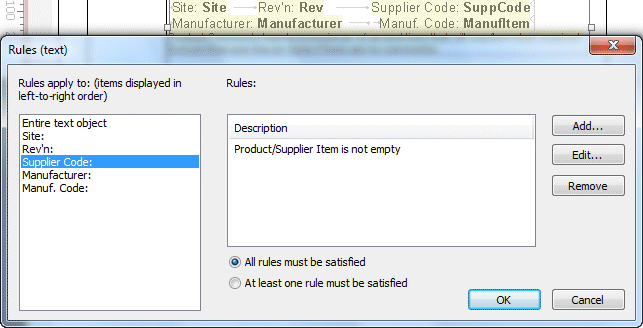
This opens the Rules window which shows rules and the objects are characters each applies to.
This object shows when Supplier Fax is not empty. i.e. there in a value in the data field Supplier Fax.
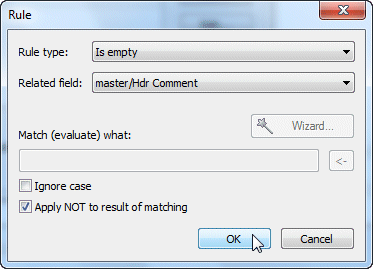
To define a rule, press Add which opens the Rule definition window.
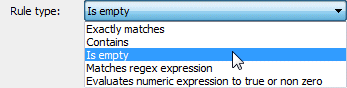
Rule type: responses are shown in the pull-down.
- Exactly matches with a string for comparison, can Ignore case (CAPITAL letters are compared as small letters (PAUL GREEN, Paul Green and paul green are equivalent).
- Contains with a string for comparison, can also Ignore case.
- Is empty checks the field is spaces or does not exist. Any expression can be turned into "not". The example above shows this. The rule would be master/Hdr Comment is not empty.
- Matches regex expression requires a new RegEx expression. The Wizard may be used to select an existing expression, or a new expression keyed in Match (evaluate) what: or a selected expression modified.
- Evaluate numeric expression to true or non zero requires setting up an arithmetic expression.

Related field: shows field names, select the field to compare.
 Match (evaluate) what: is where you
enter the value to compare.
Match (evaluate) what: is where you
enter the value to compare.
- Contains looks throughout the field, matching the characters entered.
- Exact match compares for the length of the field, various operation on the data (trim for example) make Contains preferable for other than unmodified (on input) fields.
- Numeric field rules should always use arithmetic expressions.
This rule allows non-Sydney locations (and would also disqualify North Sydney, Sydneyside etc.).

Note: Applies from Version 8.14 of FTForm Plus and forward.
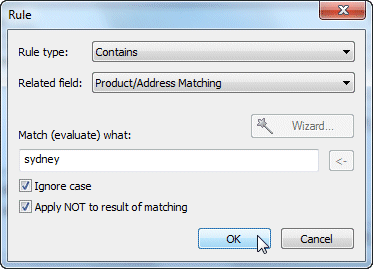
Match (evaluate) what: allows access to a list of field names to form the comparison.This compares Order Number with Order Number Local, if these are not exactly matched, the / is printed (presumably the next rule is the same and prints Order Number Local where different to Order Number).
Below is an example is comparison of literals in different languages where the Page (local constant version) is eliminated where it is the same as the data field page or lookup page.
No rules:  and with a compare for a match and elimination of a matched pair:
  .
.
Matches regex expression requires a RexEx expression, (see here for details on RegEx expressions).
Evaluate numeric expression to true or non zero requires an Arithmetic expression, (see here for details on Arithmetic expressions).
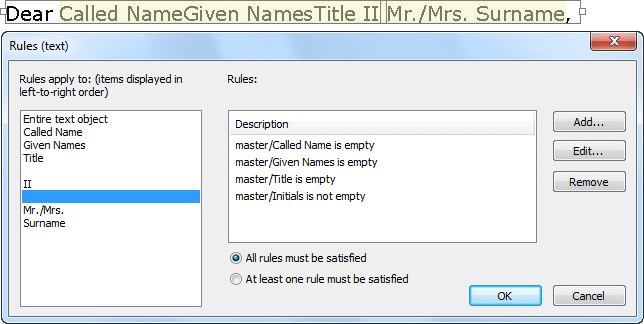
Where a field contains multiple rules, each of the component rules
may be modified as shown.
In the example, the rule for the space between II and Mr./Mrs.
is available for edit.
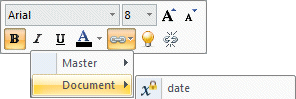
Linking Fields
Link fields to text using the Link button ![]() from the top menu or the link button
from the top menu or the link button ![]() from the
on-screen icons.
from the
on-screen icons.
A pull-down list of sources appears, pick one to show fields.
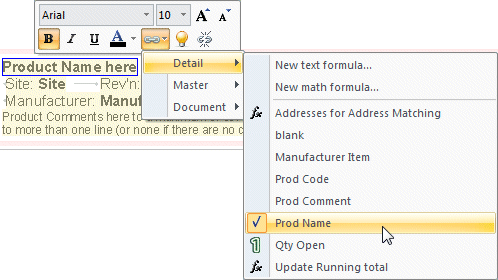
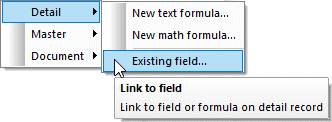
Select the field required from the list. For Detail, you can select
to add New text formula ... or New math formula... .
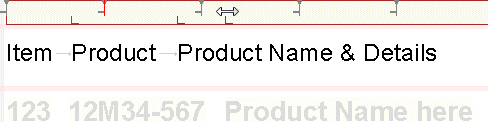
The field list shows the current linked field (Prod Name in
this example). If the field list exceeds 20 fields, you will see
just 3 choices with the final choice Existing field ...
which opens a fast selection list.
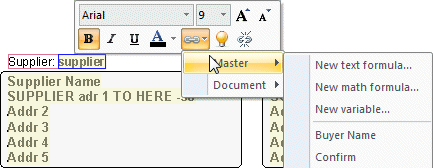
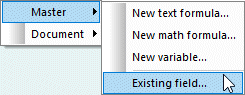
Master fields show New text formula ..., New math
formula ... and the additional New variable ...
selections at the top of the list. If the field list exceeds 20
fields, you will see just 4 choices with the final choice Existing
field ... which opens a fast selection list.
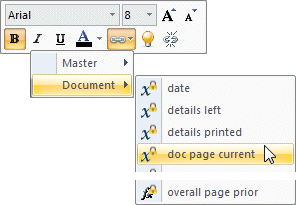
Document fields are the calculated and system values.
Select the field to populate the text, and see Formatting
Dates and Numbers as these fields are numbers or date / time
fields.
| date | System Date and Time (see here for definition and formatting) |
| details left | Number of detail layouts left to print |
| details printed | Number of detail layouts printed |
| Document page counts: | |
| doc page current | Current page |
| doc page last | Last page (aka total page) |
| doc page next | Next page |
| doc page prior | Prior page |
| Layout elements: | |
| layout first page | First page of this document (Report Header, First Page Footer) |
| layout last page | Last page of this document (Report Footer) |
| layout page footer | Not the last page of this document (Page Footer, includes page 1 of a multi-page document) |
| layout page header | Not the first page of this document (Page Header) |
| layout second page | Second page of this document (use for a second page footer opposed on duplex paper to the First page Footer) |
| Others: | |
| job page current | Current page of this job - job is the entire execution of this input file |
| job page last | Last page of this job (aka total page) |
| overall page current | Overall pages, one input may produce leading and trailing pages, this is a single count for all pages of the one document, |
| overall page last | including leading and trailing pages. A typical example would be an invoice with leading fax cover sheet and trailing T&C |
| overall page prior | including leading and trailing pages. |
| overall page next |
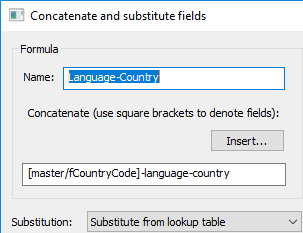
Substituted Text using Formula
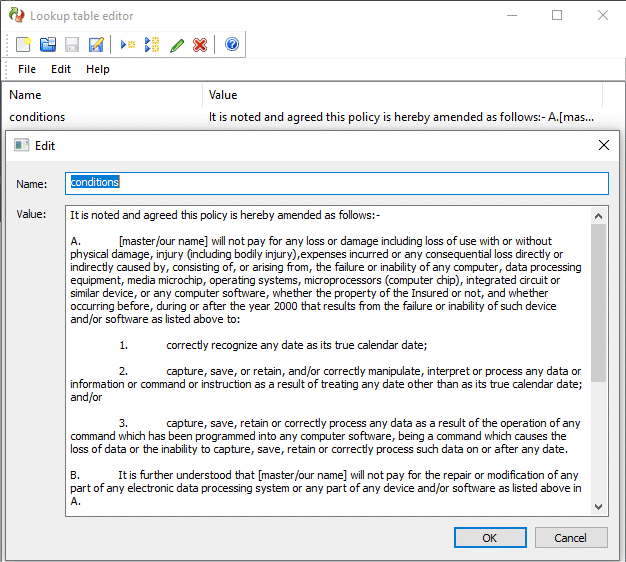
Substitution is the replacement of formula field from the Lookup file - see here for details - or uncommonly individual text files may be used for converted FTDesign forms.
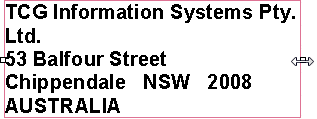
The HUGE advantage of this is it allows form content to be changed or extended with no other work than a Lookup change. Consider your company address and the impact of moving headquarters. If the address, phone number, fax number and email addresses are lookups, a simple change is reflected IMMEDIATELY in ALL forms with just one IT involvement required to update the lookup file. We did this with our company name change, just the one interaction with the lookup file, changing the our name entry from TCG Information Systems Pty. Ltd. to FormTrap Solutions Pty. Ltd. did it universally and instantly for all forms. Similarly the later change of office required just lookup file changes.
 Substitutions
MUST be based on formula. The formula MUST have Substitute from
lookup table ticked (Substitute from file for FTDesign
conversions). Ensure the data portion is defined as Trim to
remove leading and trailing spaces.
Substitutions
MUST be based on formula. The formula MUST have Substitute from
lookup table ticked (Substitute from file for FTDesign
conversions). Ensure the data portion is defined as Trim to
remove leading and trailing spaces.
Formula that do NOT include data fields are effectively constant substitutions.
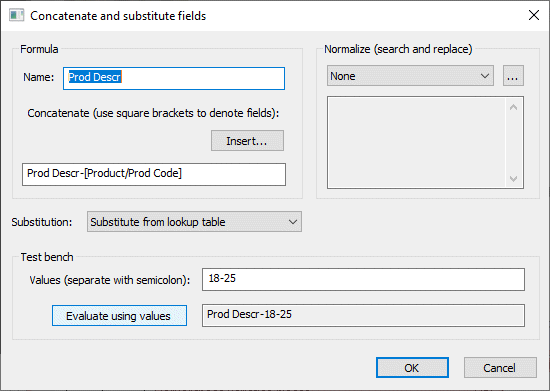
A data substitution formula might retrieve extended product descriptions, referenced by including the product number in the formula.
Use rules on the looked-up value if it is there, and use the system value if there is no lookup entry.
A record with Product Code (say 18-25) might have the Formula Name Prod Desc, with Concatenate expression Prod Desc-[Product/Prod Code] to produce what is shown in Test bench.
Linking ![]() the formula substitutes the looked-up entry content after applying
text attributes (size, font, style, orientation etc.) If there is no
Lookup Table entry, the formula stays as Prod Desc-18-25,
with a soft error logged. Rules on both components allow one of the
data value (if no lookup) or lookup value if present but never both.
the formula substitutes the looked-up entry content after applying
text attributes (size, font, style, orientation etc.) If there is no
Lookup Table entry, the formula stays as Prod Desc-18-25,
with a soft error logged. Rules on both components allow one of the
data value (if no lookup) or lookup value if present but never both.
Use either one text field with both components or individual overlapped text fields.
 This shows one field with both components included, and is our
recommendation for forms where we supply with BOTH fields linked ...
This shows one field with both components included, and is our
recommendation for forms where we supply with BOTH fields linked ...
 ... while this shows individual fields, overlapped in production.
Now the user can decide whether or not to use lookups and lookups appear only if present in the lookup table, otherwise system data appears.
Lookups return the lookup value or no change if no lookup exists (in this case Prod Descr-18-25).
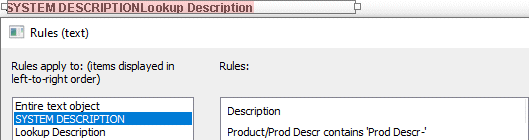
This rule is for SYSTEM DESCRIPTION which prints where no
lookup was found (value Prod Descr-18-17 contains Prod
Descr-).

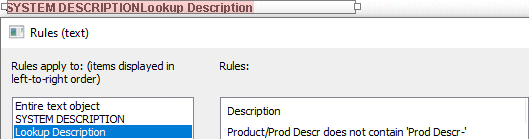
This rule for Lookup Description is the opposite and
indicates a successful lookup, hence the expanded lookup description
prints.

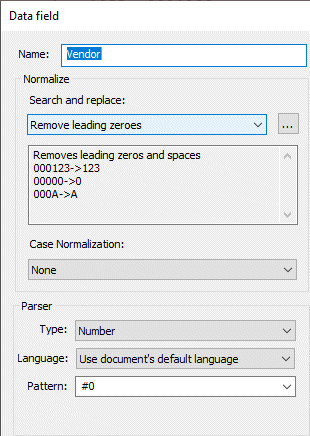
Linked fields should be defined as Normalize Trim for text
fields (to remove leading and trailing spaces) ...
... and as Normalize Trim numeric for number fields with Parser type Number and Pattern #0.
For convenience, you may instead chose Normalize as Remove
leading zeroes for supplier and customer references and
similar to use only significant digits - as shown right.
This is the data field in (data) view: 
Inclusion of field names in lookups
allows inserted data fields for HTML Emails, contracts etc., see here.
Multiple data fields may be included, in this example there are two
data fields in normal notation ([record/field]) ...
-

- This is the resulting formatted output,
including data:

Selecting Linked Fields
 Select linked fields in text by:
clicking once to outline the entire text ...
... then point (cursor is),
and click to outline that field (in blue).A "program shortcut" to select both text and field applies where text is entirely one linked field or has a previously-selected linked field. The linked data cursor
This tool
toggles the display to show the source fields for data in text objects.
... after
Sometimes Present or Absent fields
Note: The Delete empty lines button was re-programmed in Version 8-28 to more simply handle removal of redundant line feeds.
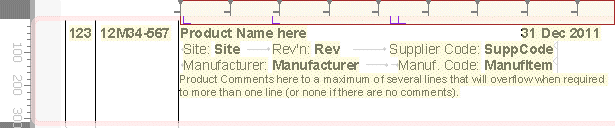
Detail records may contain fields and areas that are absent on some records. This applies particularly on invoices and purchase orders. This section is based on the tutorial for examples. In the tutorial (PO example), a detail record may have or not have these individual fields:
Site
Revision
Supplier code
Manufacturer with manufacturer item then optional
Comments (which may be zero to several lines)
The fully inclusive record structure is shown below, this structure may be missing any or all of the fields below the first line.

Define all fields in the one object, with Delete empty lines
![]() set (from Text Formatting area). This deletes lines with no
input data, and in conjunction with the record attribute Floating
height provides all cases in one structure. From version
8-28, this also removes redundant line feeds.
set (from Text Formatting area). This deletes lines with no
input data, and in conjunction with the record attribute Floating
height provides all cases in one structure. From version
8-28, this also removes redundant line feeds.

Tabs are pulled to align start-of-constants (Site, Rev'n, Supplier Code, Manufacturer and Manufacturer Code).

You can also suppress literals with no following data on an individual line (for example, the literals Site:, Rev'n: and Supplier:) by selecting each literal and applying a rule to it that prints only with data.
Highlight the literal (Site:), and press the Rule ![]() icon, set the rule as
shown below.
icon, set the rule as
shown below.
This is the finished field with literals on the lines below the main line conditional.
This is the full set of rules on literals for the two lines.
![]()
This discusses three issues that you can control in addition to the
re-purposed Delete empty lines.
Title Lines Required in Sometime Occurring Data
There are two constant title lines in this object (Deliver these
... and Additional Description).
Both need individual rules to print only when data exists (this
tests the area rule for Varieties):
This shows what prints with Varieties and no Additional
Description. The second title line is eliminated:
![]()
Repetitive Objects with Different Alignment and/or Multiple Fields
The second issue is printing repetitive objects that require a
different alignment or that have more than one field - in the
example the Variety Quantity. This can ONLY be printed as
a separate object (as the value is a number and is right-aligned).
The repetitive area MUST be the first sometimes present data printed
and Variety Quantity requires the same rule on the Entire
text field as it's literal, Deliver these ....
Locate at the same Vertical (see Properties, Position).
Deliberate Space Lines (and as sub-classes) Always Printed and Conditional
A simple always printed additional line can be inserted as a space and line feed without data and without rules.
![]()
A conditional line feed may be inserted like this:
This shows an inserted set of spaces followed by a line feed, size 3 point used to separate company information (Fax:) from sometimes absent Notes, Special Instructions and Messages. The field is shown together with it's rule which prints the small separation line only if one (or more)of the following data exists.
The printed field looks as shown below
(with Notes and Messages) and the 3 point line separates the two
groups.
![]()
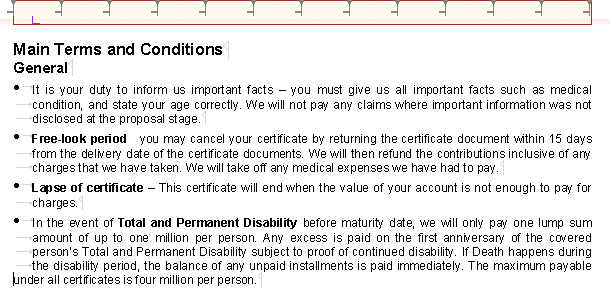
Tabs in Text Items
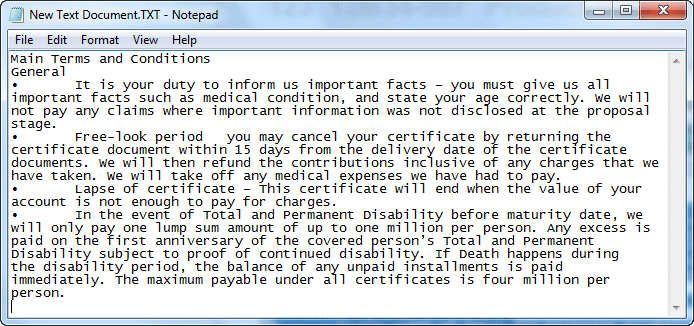
The most common use of tabbed text is for Terms and Conditions on commercial documents and for paragraphs as part of contracts. These are best held as Lookups and then massaged to the style and constraints of the document when printed.
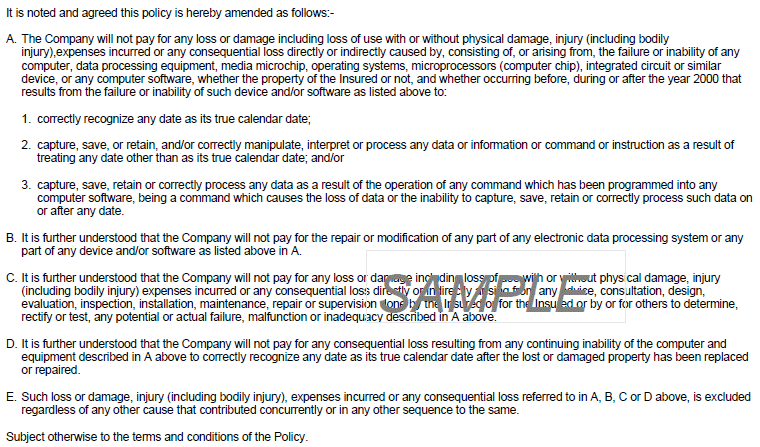
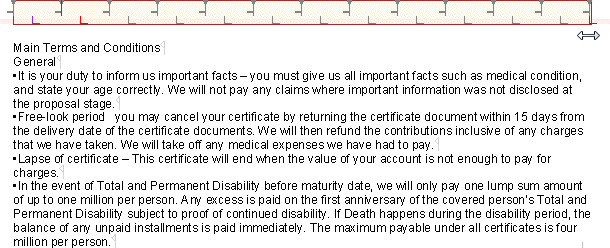
For lookups, enter tabs using Crtrl+Tab and don't worry about tab spacing, this comes from the lookup when printed. Similarly enter ALL of each paragraph as one line without word-wrap. This is an Edit of a lookup tabbed text clause:
Tab distances are entered here for when the object is printed, and
the  looks
after paragraph Indent and Overhang:
looks
after paragraph Indent and Overhang:
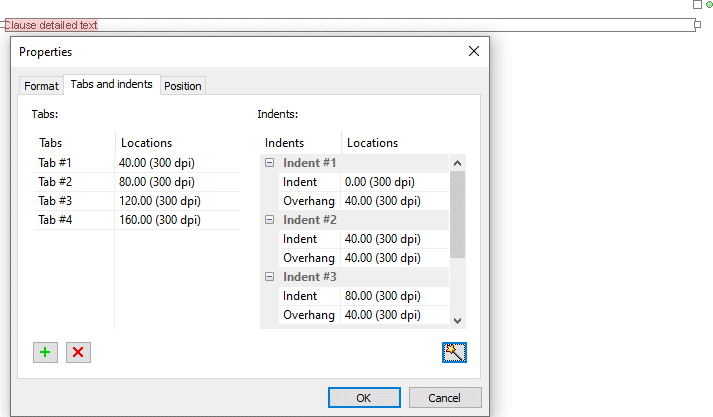
This is the printed result:
This covers use of tabs in a FormTrap document that are not from
lookups:
Pull Tabs to align text. Key the tab
symbol into the text (tab shows purple instead of black), then pull
the tabs to where you want that section aligned. Pull from the left
and progress to the right. It may be useful to start the text keying
with a tab to allow the first item to be positioned.

Tabbed text may be used, however is complex and generally only for users willing to invest time to understand the facilities.
This is a constant text file that
requires alignment as tabbed text after the bullet:
Do this by adjusting the first tab to the correct position, then
pull the second tab outside the object.
Set all fonts, sizes and anything else that impacts length. Finally,
set Justified ![]() , and insert tabs at the front of each line
(after the bullet if that line has one), from top to bottom.
, and insert tabs at the front of each line
(after the bullet if that line has one), from top to bottom.
This shows the steps one at a time:
Initial object, is copied from the
toolbox and brought to the correct length.

This is pasted over with the long text including bullets (you can
copy from Word or any other text editor).
Move the first tab to the correct position, behind the bullet,
figure shows the first tab being moved to the left.

Move the second tab behind the object, figure shows the second tab
positioned, ready to release mouse right.
Make the object justified and apply all changes that impact length
of the text. In the example, we have changed the point size on the
bullets, on headings and have bolded certain words. Once that is
done (and not before) insert tabs top-to-bottom, behind each bullet
and at the start of continuation lines. The figure shows all tabs
applied except the last line where we are about to insert a tab.
Note how increasing the size of the bullet to 14 point effectively
inserts space between each bullet text which is 9 point.
Top
Indented Paragraphs in Text Objects
Per the previous section, this is easily done in text Properties, Tabs and indents by setting tab distances, then selecting the Wizard to automatically adjust paragraph Indent and Overhang.
Remaining instructions cover paragraphs where you want to control inserted tabs, regardless of the size of data inserts, justification and other run-time changes such as substitution. If an indented paragraph is likely to change, take the trouble to read and understand how to apply indents.
The tools above the text block  comprise Indent
  , Hang
  and Tab
  .
.
These, in conjunction with the pull-down selections from the
Indent ![]() icon in the Text area provide tools for complex constructions such
as paragraph clauses.
icon in the Text area provide tools for complex constructions such
as paragraph clauses.
This is the Indent pull-down: 
It is strongly recommended to use Customize Quick Access
Toolbar to add the Indent pull-down icons for Increase
 ,
Decrease
,
Decrease  , All
, All  and Hanging
  as these are used repetitively.
This is the starting position.
Inserting a tab after the bullet, and pulling the tab left gives this:

Pulling the Hanging tool to match the tab shows no change, the change
comes when the next step is applied.
Indent ![]() and selecting
and selecting  hangs the remaining lines of the paragraph.

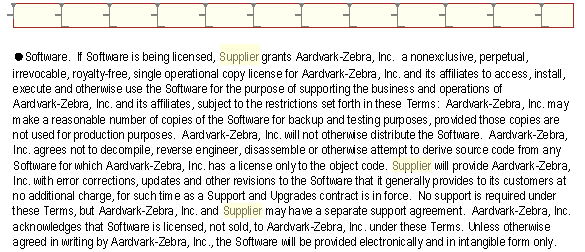
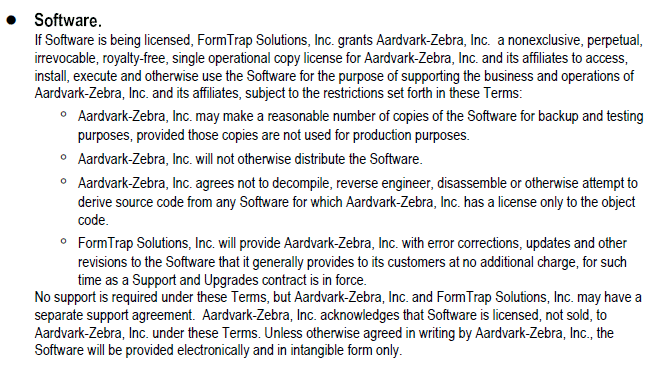
We require the left-hanging sections through to "Supplier will provide ..." indented to the next level. First insert end-of-paragraphs (Enter) marks between contract phrases and make other changes.
Apply Indent ![]()
 to indent the four paragraphs. Paragraphs end with
  .
.
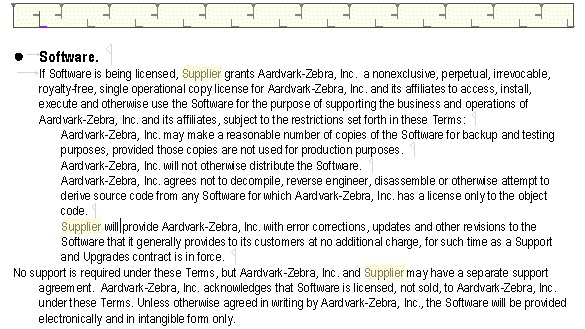
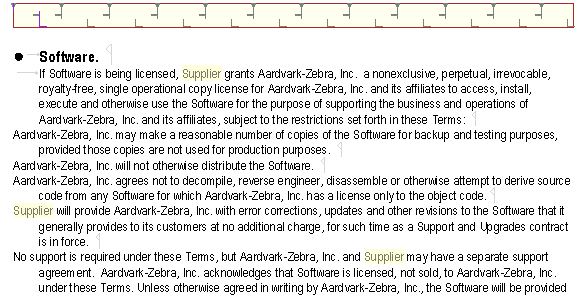
Insert the white bullet (see here) ahead of each of the "increased" paragraphs, and insert a tab after each white bullet.
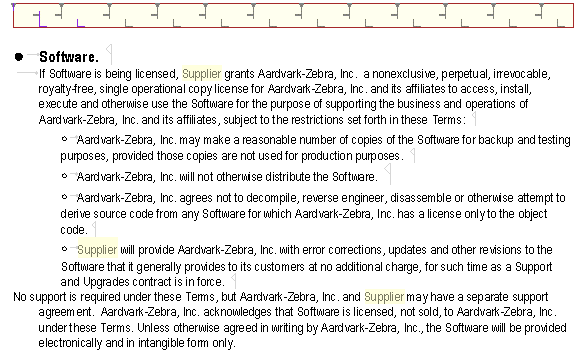
Apply
to each indented paragraph (note that paragraphs defined via Indent
may contain variable-length data, will be line wrapped and can be
justified).
Position the second hang above the tab to complete the indented text.
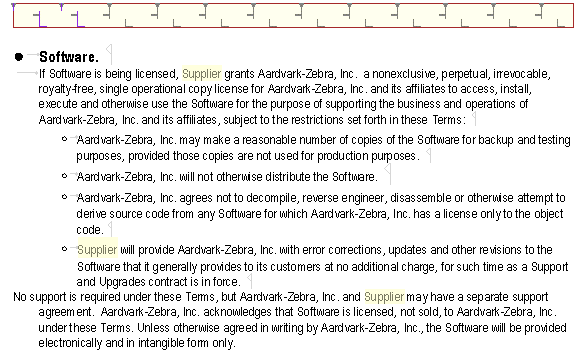
Inserting a tab in the last paragraph completes this section of the contract document. This is the printed, indented contract section:
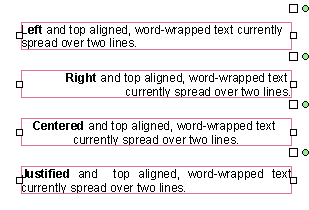
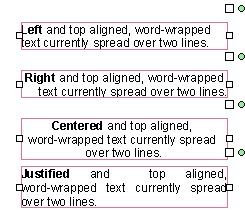
Horizontal Alignment of Text Objects
| Left | |
 |
| Right | |
 |
| Centered | |
 |
| Justified | |
 |
Justified wraps but respects deliberate line feeds, with the example above as space-separated (no line feeds).
Decimal alignment ![]() (right alignment on a nominated character, from
the right of each line) is used for decimal alignment and for
alignment of lists of data names and data. Decimal alignment sets
word wrap off (see Word Wrap).
(right alignment on a nominated character, from
the right of each line) is used for decimal alignment and for
alignment of lists of data names and data. Decimal alignment sets
word wrap off (see Word Wrap).
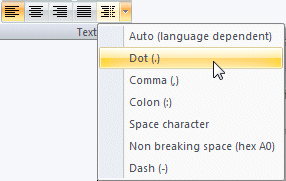
This is the pull-down list for character alignment.

This shows before and after alignment to the dot:
This shows before and after alignment to the colon:
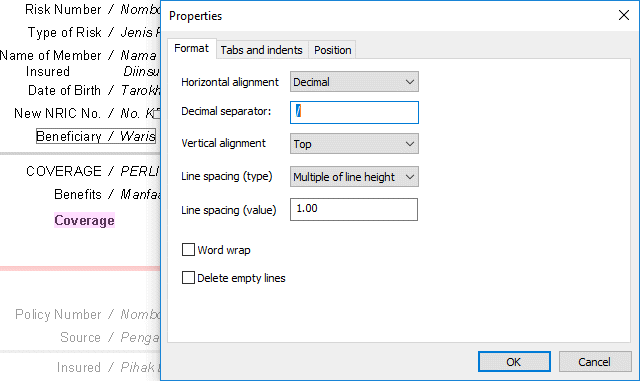
Additional characters may be used via Properties, Format tab - shown
here for slash alignment.
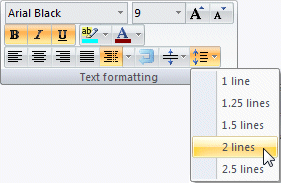
Vertical Alignment and Line Spacing
| The Vertical Alignment tool |
 |
| This example shows identically vertically centered text blocks with two and three lines (these show slightly different at this scale but are perfectly aligned at increased scale): |  |
| The Line Spacing tool |
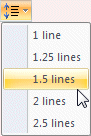 |
| Properties, Format tab allows an exact measurement for inter-line spacing. | 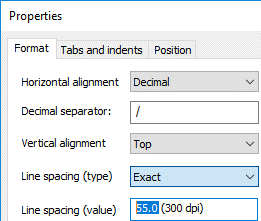 |
Word Wrap
The Word Wrap tool ![]() turns word wrap on or off.
turns word wrap on or off.
On breaks lines vertically where Text Block size is exceeded. Growing/shrinking is from the horizontal alignment point.
Off allows lines to grow/shrink horizontally.
Decimal alignment ![]() turns Word Wrap off.
turns Word Wrap off.
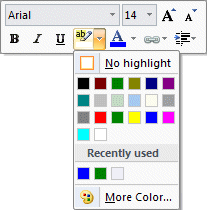
Font, Size, Color, Highlight Color
These are chosen from either the top Text formatting menu or the on-screen menu (press Mouse Right to open at cursor position when a text object is selected).
| Font is selected from the pull-down menu: | 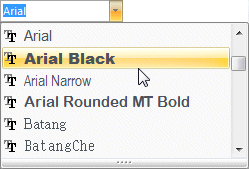
|
| Size is selected with these tools including "one size up" and "one size down". You can key your own point size, including decimals at the top of this block. | 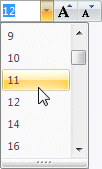 |
| Style is selected from these tools (Bold, Italic, Underlined). |  |
| Font Color is selected using this tool. | 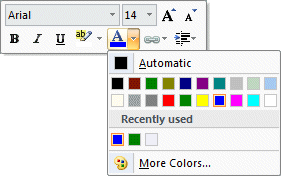 |
| Highlight Color is selected using this tool. White highlight may be used for objects that overlay frames, such as a C/Fwd line ... |
 |
| This is an object with all these options shown: | 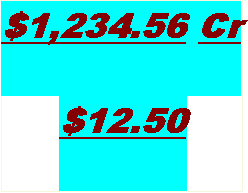 |
| Bold, Italic, Underlined, Brown, Blue Highlight, Text
Decimal Aligned, Spacing 2 lines. Word wrap is off |
 |
On Screen Icons
| Pressing Mouse Right with a text object selected shows an on-screen menu of icons at the position of the cursor. These act identically to the top menu icons. | |
Text Manipulation
The source Text Block for these examples is word wrapped, aligned left and bottom.
Change Size
Change size tool  allows pulling word wrapped text objects only to a different size.
This shows word wrapped text where the "old" size is now too narrow
with word wrap on the first line.
allows pulling word wrapped text objects only to a different size.
This shows word wrapped text where the "old" size is now too narrow
with word wrap on the first line.
Select Change Size  (to show the pull handles), and pull to size:
 |
|
 |
 |
| Text about to pull size | Text after pull size |
Change Rotation
The Rotation tool  shows a rotation handle (green circle). Rotate by
pressing and holding mouse-left over the green circle, the green
circle disappears while you rotate; the object is placed when
mouse-left is released. Rotation is at the center of the frame.
shows a rotation handle (green circle). Rotate by
pressing and holding mouse-left over the green circle, the green
circle disappears while you rotate; the object is placed when
mouse-left is released. Rotation is at the center of the frame.
Note: Text rotation in PCLXL (PCL6) applies operates only at 0º, 90º, 180º and 270º angles. PostScript does not have this restriction. Text will print in PCLXL, rounded to the nearest angle with a warning posted to FormTrap Spooler's log file.
About to rotate (on the green circle)
Rotation in progress
 Finished rotation
Holding down Ctrl rounds the rotation to multiples of 7.5°. This allows easy selection of 90° angles (also 30° and 45°). Without Ctrl, "near misses" are possible.
Nudge
Nudge uses the keyboard arrows to move text object(s) and for word wrapped text, to adjust their size. Set Nudge values using Tools, Nudge (see here for details).
Pressing a keyboard arrow moves the object the Nudge value, in the direction of the arrow.
Holding down Shift when pressing an arrow moves the bottom or right boundary by the nudge value, adjusting object size. Rotated objects have their trailing boundary moved. This may look odd for rotated text objects, see the diagrams below for examples (the boundary shifted is at the end of the text and will not compress to less than the nudge value).
Size changes first moves the boundary, then recalculates the alignment point, then re-wraps text to fit into the revised area. The example show before and after for Shift pressed plus left arrow.
Default Dates and Currency for Multiple Countries and Languages
If the form operates in the one country, press here to skip to the next section.
Release 8.20 introduced automated Currency, Date
and Number formatting, based on a data file field containing language-country.
This means this one form may operate with multiple conventions for
Date, Numbers and Amounts.
There is a PowerPoint overview here
and a PDF that you can read in conjunction with this section here.
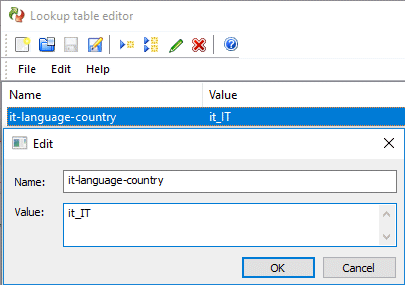
Output is formatted to Language-Country which must be in a Master field or lookup entry based on Country. This shows (part of) a master formula and the lookup entry for Italian Language-Country, where the input field [master/fCountryCode] contains IT
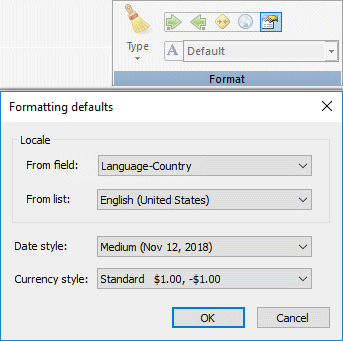
The ![]() defaults icon allows defaults to be set, as shown to the right.
defaults icon allows defaults to be set, as shown to the right.
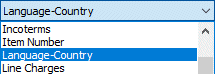
From field: shows a list of master data fields, select the field or formula containing Language-Country:
Data field is usually a Country
(from which Language-country is retrieved from a
lookup entry), for example:
| Country | Language-Country | Conventions Applied |
| USA | en_US | english-USA |
| UK | en_USA | english-UK |
| France | fr_FR | french-France |
| Canada | fr_CA | French-Canada |
| PRC | zh_Hans_CN | simplified chinese-China |
| Japan | ja_JP | japanese-Japan |
The full ISO list is linked here www.localeplanet.com/icu/index.html.
This defines how output is formed, using the ICU standard formats.
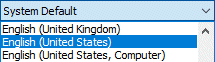
From list: shows a list of Locales, and is what is used when From
field is empty or is incorrect (this is the Locale of the
computer running FormTrap Server - this may not be the same as the
Form Design computer):
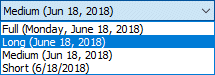
Date style: shows a list with English (United
States) examples. Select one.
Currency style: shows a list with English (United
States) examples. Select one.
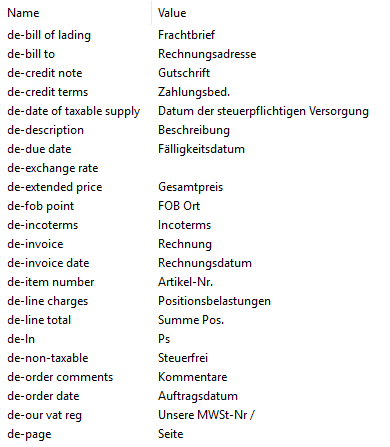
You will require lookup translations for all of the constants in a
form, this shows a partial list for German.
File locale-test.zip containing a test form, test data file, resulting PDF output and ReadMe.txt file showing how to test additional Locales and is available here.
Formatting Dates and Numbers
This section uses ICU (international Components of Unicode) library, see here for documentation: http://site.icu-project.org/ to format dates, numbers, currency, percentages and amounts.
The text to be formatted must be outlined in blue. For a "refresher" on selection please look here.
The Format toolbar formats the selected, linked text field
(outlined in blue).
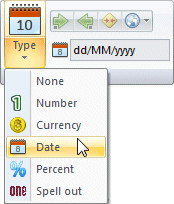
From the Type pull-down select the output format.
Numbersformat is in the locale of the computer
Change using the Localeicon, from English to French in this example.

 These are format patterns for
English and French. "#" is a suppressed number and "0" is not
suppressed. Thousands separator is "," or space, decimal separator
is "." or ",".
These are format patterns for
English and French. "#" is a suppressed number and "0" is not
suppressed. Thousands separator is "," or space, decimal separator
is "." or ",".

This shows input and formatted object for the above English format
pattern. Value is rounded to 1234.600 which is then suppressed back
to one rounded decimal printed.
 The Remove thousand separator
  button will remove the
  from output.
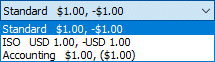
Colon-separated from the Positive string is the negative string, with the minus sign first.
Modify the negative string to use any other position or form of negative, such as those shown.

Starting field value (will round).

String and result for trailing minus

String and result for trailing Cr
Negatives for percentages and currency are handled the same way, allowing a variety of negative representations, including ($1,234.56) as the negative.
Percentage  formats as a percentage. If the originating field
is a number, it is multiplied by 100 (and rounded if required).
Pattern may be changed for more or less decimals, suppressed /
significant digits and locale conventions applied, as for numbers.
formats as a percentage. If the originating field
is a number, it is multiplied by 100 (and rounded if required).
Pattern may be changed for more or less decimals, suppressed /
significant digits and locale conventions applied, as for numbers.
Words  converts numbers to words.
Currency ![]() formats with locale currency and format.
formats with locale currency and format.
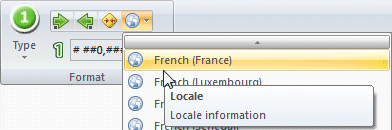
Apply Locale ![]() to convert values into that locale's conventions.
This allows position and application of the currency and negative
symbols to be changed, while the thousand separator and decimal
remain fixed to that Locale's conventions.
to convert values into that locale's conventions.
This allows position and application of the currency and negative
symbols to be changed, while the thousand separator and decimal
remain fixed to that Locale's conventions.
 Applying
  gives this as the result.

 Further formatting, moving currency symbols
first gives these as results:
Further formatting, moving currency symbols
first gives these as results:


 One
One  includes the currency symbol ($, €‚ ¥ etc), two
(copy and paste) formats with the ISO three-character currency. You
may key a space in the format as shown (second example) and MUST
edit the negative string as well as the positive string.
includes the currency symbol ($, €‚ ¥ etc), two
(copy and paste) formats with the ISO three-character currency. You
may key a space in the format as shown (second example) and MUST
edit the negative string as well as the positive string.
 Date
Date ![]() formats are keyed into the string, with the day
month text translated into locale values (English shown). Date
includes time-of-day in locale format.
formats are keyed into the string, with the day
month text translated into locale values (English shown). Date
includes time-of-day in locale format.
| input | 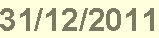 |
| formatted |  |
For 04/02/11 (4th February, 2011), these are formatting characters and outputs. Characters other than d e M and y are included as they are keyed. |
||
d/M/yy |
4/2/11 04-02-2011 02 4 2011 2011 04 02 Fri 4 Feb 2011 Friday 4 February, 2011 |
|
Time-of-day is similarly translated using characters h, H, m, s, S and A. These are translations for Time of Day as 13:14:15:29 (29/100th of a second): |
||
hh:mm |
01:14 13:14 01:14:15 PM |
|
Note: the source field date is translated using a similar parser. Translation using text values for month from language to language is possible, this is in English.
| input |  |
| formatted |  |
Locale ![]() may be used to convert dates into a locale's
conventions. This shows 31-03-2012 in Locale Russian with Day of
Week and Month.
may be used to convert dates into a locale's
conventions. This shows 31-03-2012 in Locale Russian with Day of
Week and Month.

System Date and Time
Document, date selection returns the system date and time, where date is shown in the format for the Locale you are working in. You should print this first, unformatted, to see the system presentation. The date presentation should be copied to the field, format for English is dd/MM/yyyy and is copied as (for example) 31/12/2013.
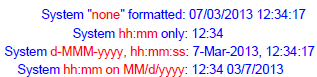
Format the date as required and include time formatting if you want time to be shown.
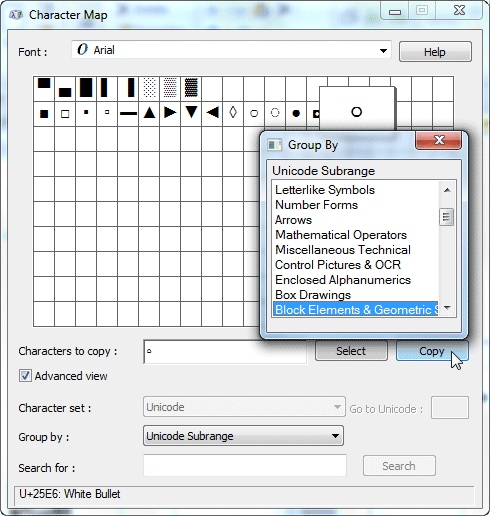
Using Special Characters in Text Objects
Special characters are often required in text objects, including bullets, trade mark, registered and other symbols. The best way is to copy from program charmap.exe which is run from the Start menu (left bottom of screen). The example shows charmap being used to copy a white bullet. Note the additional menu is from the prompt Group by:.
Regex Rules for Text
RegEx rules are normally generated by changing an existing RegEx rule to match the tests required. Most new RegEx rules are multiple "include" or "exclude" tests for two or more objects. If you want to add to the list of RegEx rules, see here for details.
This shows a completed RegEx rule that selects people living in three cities.
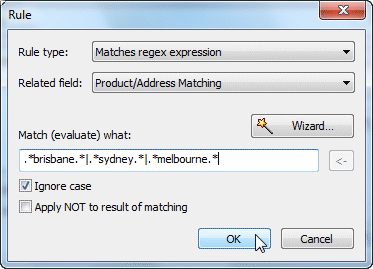
Related field: selects the data file to which the expression applies.
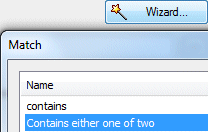
Wizard opens a list of available RegEx expressions. In this example we want to qualify three cities. There is a Contains either one of two selection which is close.
The equivalent RegEx expression appears in Match (evaluate) what:. Copy the last expression ...
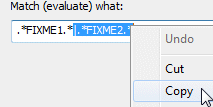
... and paste it to the end to give three places to replace FIXMEx with what you want to test for.
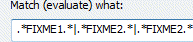
Overwrite FIXMEx with what you want to test for.
Support is not available under our Support and Upgrades contract with customers. If you have issues with RegEx and/or require new RegEx made for you we will do this at our then current consulting rates, in 15 minutes increments (current rates for calendar 2013 are $60 / 15 minutes in AUD or USD).
Documentation of RegEx is on the web at this address: http://regular-expressions.info/
Arithmetic Rules for Text
Evaluates numeric expression to true or non zero does not require Related field:, instead any required fields are directly included into the expression defined in Match (evaluate) what:.
Expressions are constructed by directly keying numeric values and the operators + (plus), - (minus), * (multiply) and / (divide) along with inserts.
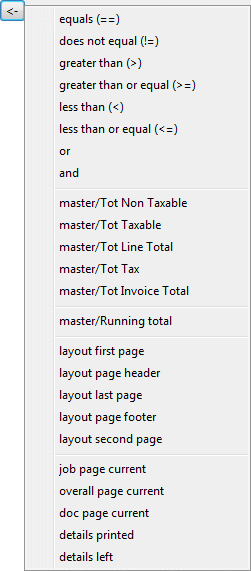
The Insert  button lists available comparisons, numeric
fields and system values, select a name to insert.
button lists available comparisons, numeric
fields and system values, select a name to insert.
This finished expression tests for true and would identify the sum of aged balances being non-zero, hence the requirement to print aged balances.
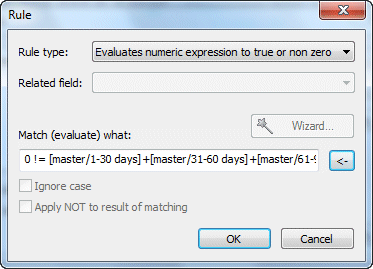
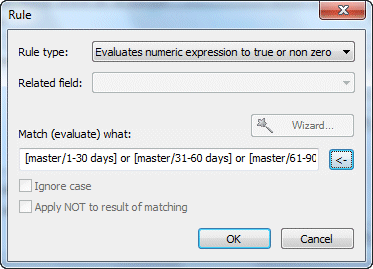
This finished expression tests for non zero and would identify any aged balance being non-zero (including offsetting plus and minus values which the prior expression would not evaluate as true).
Note: muParser is what FormTrap uses for arithmetic expressions. This is a very capable mathmatics library with many features. View the full list of operands for muParser by clicking here.
Support for muParser is not available under our Support and Upgrades contract with customers. If you have issues with muParser and/or require new muParser expressions made for you we will do this at our then current consulting rates, in 15 minutes increments (current rates for calendar 2021 are $75 / 15 minutes in AUD (inc. GST) or $50 /15 minutes in USD).