Queue Setup


Create a Queue
Once a data folder is created and loaded, queues are created to accept, identify and route and/or process incoming data.
For Version 8, please delete all grey (template) queues as their functions are included in the Version 8 load files.
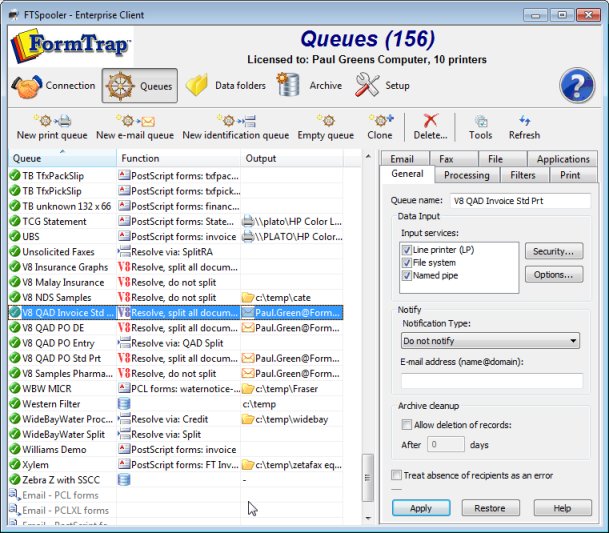
To create a new queue or modify an existing queue, configure queue properties in each tab in the properties Bar, located in the right side of the FormTrap Server Window. General, Processing, and Filters specify how to identify and build FormTrap documents whereas Print, Email, Fax, and Applications deal with delivery options. General and/or Processing or Filters tabs are the minimum requirements for new queues.
These create a queue using the entire tab set:
These facilities target Version 7 and are only
occasionally useful in Version 8. Press HERE
for Version 8.
"Template" queues are available (grey and at the bottom of the Queue list) and can be modified or new ones added to be models used by the New TYPE queue options on the menu. We recommend a template queue for each of the three shortcuts.
Shortcuts condense queue properties for the common queues into a single window,
Empty queue
To create a new queue:
- Select Empty queue button from the top menu.
- Properties Bar presents the General
tab:
- Enter unique Queue name and set Data Input options.
- Notify (optional) sets an email address for successful and/or failure notification emails.
- Archive (optional) sets successful archive duration (failures are always archived). Nothing in Number of days to keep records means all entries are kept, indefinitely, and is not recommended. Expired entries are automatically purged several times per day during inactive periods.
- Click Apply to save the settings.
- More information on Queue Properties - General
- Processing tab provides the Data Folder choice which then allows discrimination between versions 7 and 8. Version 8 is simpler.
- Version 8 identifies documents via their form designs and provides fixed split choices, click Apply to save the settings.
- Version 7 provides logic control over each
data type identified by the (optional) Rules file, which then
appear in the Formatting and Replication list. Without a Rules
file, just the one entry appears in Formatting and Replication.
- Set the split rules, form(s), queue re-directions, formatting options and processing options for this queue.
- Click Apply to save the settings.
- More information on Queue Properties - Processing
- Filters tab is used to add "Filter Programs"
at various points. Filters modify their input data to produce
output. An External Input Filter is used to convert data from the
locale (e.g. US English) to UTF-8 code. The Western
filter is used for Western languages. Other locale filters are
available from FormTrap support. User-written filters are very
occasionally used to address very difficult data representation
problems. Post formatting filters may be used to
action device-specific operations, such as stapling. Associated
file filters are used for user-written routines (such
as removal of characters with meaning as File Names where the user
has no control of field values like "Invoice 1234/56").
- Add external input filters, pre-identification filters, post-formatting filters or associated file filters for this queue.
- Click Apply to save the settings.
- More information on Queue Properties - Filters
- Print tab nominates which printer(s) to associated with this queue as well as printer filters for delivery. Click Apply to save the settings.
- More information on Queue Properties - Print
- Email tab configures email delivery settings, output via SMTP service, Outlook (MAPI) or TLS/SSL (Office 365, Gmail, Yahoo, others). Click Apply to save the settings.
- More information on Queue Properties - Email
- Fax tab defines options for delivery via e-Fax (recommended) or Windows Fax Service (retained for older systems). Click Apply to save the settings.
- More information on Queue Properties - Fax
- File tab defines write-to-file options, including setting up folder structures for PDF archival. The FormTrap Archive Module - view manual here - provides a full archiving system for both FormTrap and external documents, organized in a FireBird DB. Click Apply to save the settings.
- More information on Queue Properties - File
- Applications tab defines options for customized delivery processes, such as third party fax products, or for your own applications. FormTrap Archive is included and dormant as an application under Setup, Applications, Archive. Click Apply to save the settings.
- More information on Queue Properties - Applications
Clone (copy) a queue (this is mainly a Version 7 facility)
If the queue being created is similar to an existing queue, select
Clone. This creates a new queue using the
highlighted queue's settings. The new queue's name and properties
can then be modified.
This is most useful where queues with extensive rule files are
required duplicated across a number of printers, and there is no
data in the document to dynamically allocate printers based on
either a lookup or substitution.
To copy an existing queue:
- Select the queue to be copied.
- Select Clone button from the top menu.
- General tab presents, with Queue name shown as copy of highlighted queue, change this (at minimum), plus any other tabs, notably Print. Template queues are included for Version 7.
Ignore the remainder of this document unless using Version 7 forms.
New print queue (this is mainly a Version 7 facility)
This is a short cut to create a simple print queue from a template queue:
- Select New print queue button from the top menu.
- The Simple print queue dialog box pops up.
- Enter the Name of the queue.
- Choose the Template to copy.
- Choose the Form to be used in the queue. The available forms from the dropdown menu display in the format of form name (datafolder name), for instance, statement (formtrap), where statement is the form name and formtrap is the datafolder name.
- Select a Printer from the dropdown menu.
-
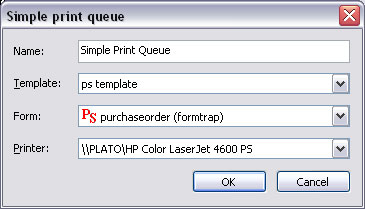
- Click OK.
New email queue (this is mainly a Version 7 facility)
Use this option if you have an email template queue to copy.
To create a simple email queue from an existing template:
- Select New e-mail queue button from the top menu.
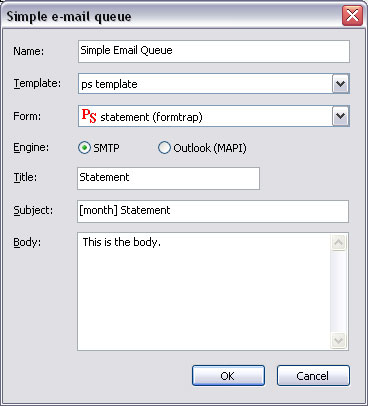
- The Simple email queue dialog box pops up.
- Enter the Name of the queue.
- Choose the Template to copy.
- Choose the Form to be used in the queue. The available forms in the dropdown menu display in the format of form name (datafolder name), for instance, statement (formtrap), where statement is the form name and formtrap is the datafolder name.
- Select either SMTP or Outlook (MAPI) for the Engine option.
- Fill in the Title, Subject, and Body of the email. Use an associated file variable by quoting the associated file name in square brackets "[" and "]" (for example [Invoice No]) or leave “as is†to use specific Associated File fields (for example SMTPTo, Subj and SMTPBody).
- More information on Using Associated Files in FormTrap Server Queues Properties
-
- Click OK.
New identification queue (this is mainly a Version 7 facility)
If the queue being created receives input that needs to be identified and routed, and is similar to one of the templates, use this to create it. The new queue's properties can be modified as necessary.
To create a simple identification queue from an existing queue:
- Select New identification queue button from the top menu.
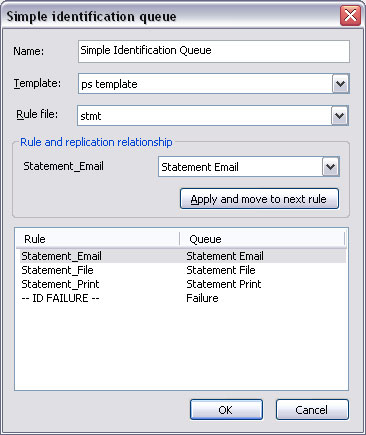
- The Simple identification queue dialog box pops up.
- Enter the Name of the queue.
- Choose the Template to copy.
- Choose the Rule file to be used in the queue.
- Choose the queue to be replicated to the selected queue, and click the Apply and move to the next rule button to continue. One queue per rule must be entered.
-
- Click OK.
Create a template Queue (this is a Version 7 facility)
A template queue can be created as the to copy queue for other queues that share it's standards.
To create a template queue:
- Right click and select New template from the list.
- Update the queue properties in the Properties Bar (at minimum Queue name on the General tab).
- Save the queue as a named template.
Describe the queue in the name (for example Print Queue - PCL) and set all of the standard tabs to match your most common queue type.